Module hubspot.trigger

ballerinax/hubspot.trigger Ballerina library
Overview
The Ballerina listener for Hubspot allows you to listen to the following events in a HubSpot account, grouped by the CRM object they relate to.
- Company (
CompanyService):onCompanyCreation,onCompanyDeletion,onCompanyPropertyChange,onCompanyAssociationChange,onCompanyMerge,onCompanyRestore - Contact (
ContactService):onContactCreation,onContactDeletion,onContactPropertyChange,onContactAssociationChange,onContactMerge,onContactRestore,onContactPrivacyDeletion - Conversation (
ConversationService):onConversationCreation,onConversationDeletion,onConversationPropertyChange,onConversationPrivacyDeletion,onConversationNewMessage - Deal (
DealService):onDealCreation,onDealDeletion,onDealPropertyChange,onDealAssociationChange,onDealMerge,onDealRestore - Ticket (
TicketService):onTicketCreation,onTicketDeletion,onTicketPropertyChange,onTicketAssociationChange,onTicketMerge,onTicketRestore - Product (
ProductService):onProductCreation,onProductDeletion,onProductPropertyChange,onProductMerge,onProductRestore - Line item (
LineItemService):onLineItemCreation,onLineItemDeletion,onLineItemPropertyChange,onLineItemAssociationChange,onLineItemMerge,onLineItemRestore
This module receives HubSpot's webhook events directly, batched into a single delivery when multiple events occur close together - it does not call HubSpot's own REST API on your behalf.
Setup guide
Before using this connector in your Ballerina application, you need a HubSpot developer account and app, and a Ballerina service that HubSpot can reach over the internet to deliver webhook payloads to. The steps below cover a quick local test setup; see Production / business integration for deploying for real use.
Step 1: Create a HubSpot Developer Account
Sign up for a HubSpot developer account if you don't already have one.
Step 2: Install the HubSpot CLI
Install the HubSpot CLI (v7.6.0 or later) using npm:
npm install -g @hubspot/cli@latest
Authenticate the CLI with your developer account:
hs account auth
This opens a browser window. Log in and follow the prompts to link the CLI to your developer account.
Step 3: Create a Developer Test Account
A developer test account is an isolated HubSpot CRM account used for testing. It is separate from your developer account.
- In your developer account portal, navigate to Testing → Developer test accounts.
- Click Create developer test account and follow the prompts.
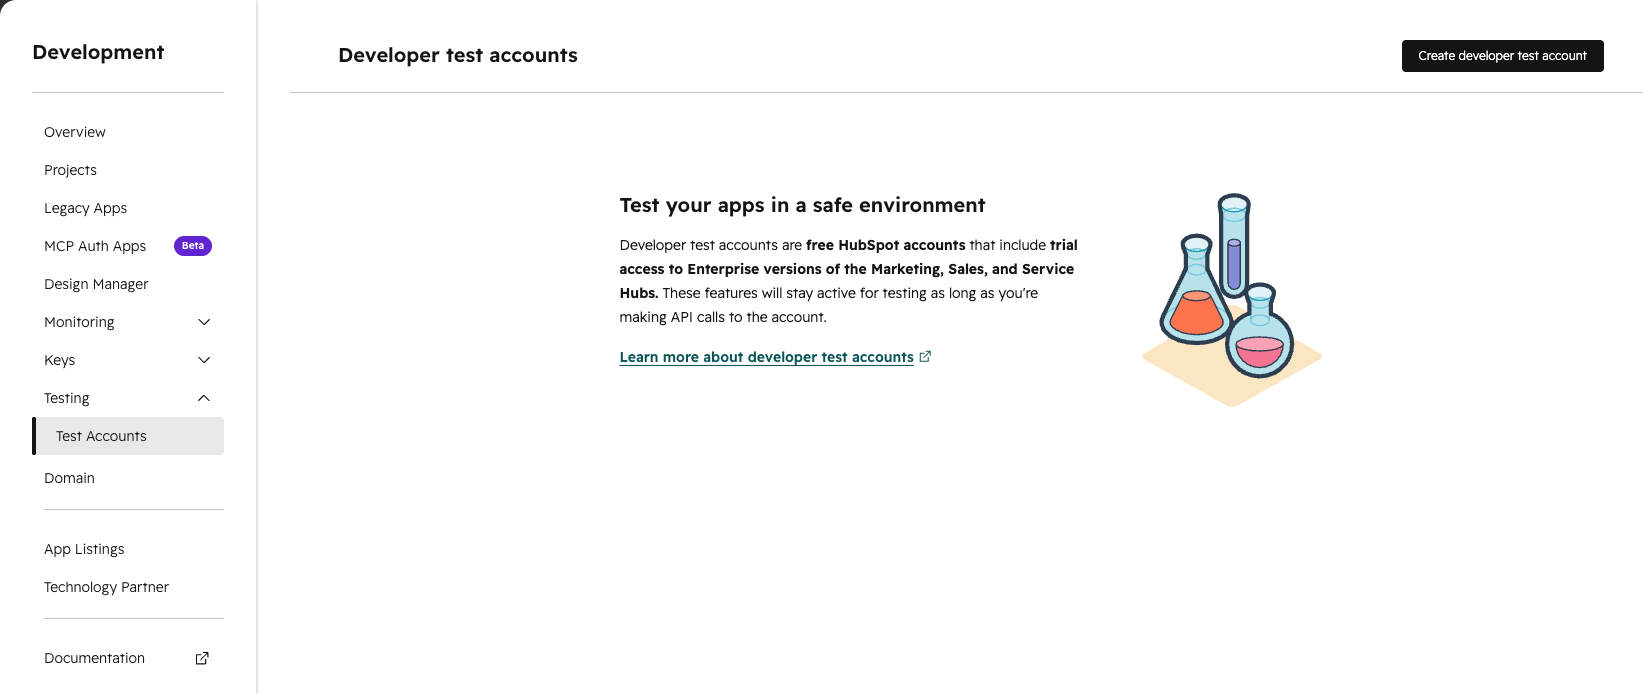
Step 4: Set Up ngrok
The Ballerina listener runs locally and needs a publicly accessible URL so HubSpot can deliver webhook events to it. ngrok creates a secure tunnel from a public URL to your local service.
Install ngrok and start a tunnel on port 8090 (the default port for the Ballerina listener):
ngrok http 8090
Copy the HTTPS forwarding URL from the ngrok terminal output. It looks like:
https://xxxx-xxx-xxx-xxx.ngrok-free.app
Save this value — you will need the ngrok URL when configuring the webhook in Step 6 and in the Quickstart section.
Step 5: Create a HubSpot Developer Platform App
-
Create a new project using the HubSpot CLI:
hs project createWhen prompted:
- Base contents → select
App - Distribution → select
private - Auth → select
oauth - Features → select
Webhooks(press spacebar to select, enter to confirm) - Name → enter a name for your project (e.g.
hubspot-webhook-app)
- Base contents → select
-
Replace the contents of
src/app/app-hsmeta.jsonwith the following, adjusting theuid,name, andrequiredScopesas needed:{ "uid": "hubspot_webhook_app", "type": "app", "config": { "name": "hubspot-webhook-app", "distribution": "private", "auth": { "type": "oauth", "redirectUrls": ["http://localhost:3000/oauth-callback"], "requiredScopes": [ "oauth", "crm.objects.contacts.read", "crm.objects.companies.read", "crm.objects.deals.read", "tickets", "e-commerce", "conversations.read" ], "optionalScopes": [], "conditionallyRequiredScopes": [] }, "permittedUrls": { "fetch": ["https://api.hubapi.com"], "iframe": [], "img": [] }, "support": { "supportEmail": "support@example.com", "documentationUrl": "https://example.com/docs", "supportUrl": "https://example.com/support", "supportPhone": "+18005555555" } } }The
requiredScopesabove is the full set covering every object this listener supports. Cherry-pick only the scopes for the objects you intend to subscribe to — each object's events require its corresponding scope:Object Required scope(s) Contact crm.objects.contacts.readCompany crm.objects.companies.readDeal crm.objects.deals.readTicket ticketsProduct / Line item e-commerceConversation conversations.read
Step 6: Configure Webhook Subscriptions
Replace the contents of src/app/webhooks/webhook-hsmeta.json with the following. Replace <YOUR_NGROK_URL> with the ngrok URL you copied in Step 4.
{ "uid": "hubspot_webhook_subscriptions", "type": "webhooks", "config": { "settings": { "targetUrl": "<YOUR_NGROK_URL>", "maxConcurrentRequests": 10 }, "subscriptions": { "legacyCrmObjects": [ { "subscriptionType": "company.creation", "active": true }, { "subscriptionType": "company.deletion", "active": true }, { "subscriptionType": "company.propertyChange", "propertyName": "name", "active": true }, { "subscriptionType": "company.associationChange", "active": true }, { "subscriptionType": "company.merge", "active": true }, { "subscriptionType": "company.restore", "active": true }, { "subscriptionType": "contact.creation", "active": true }, { "subscriptionType": "contact.deletion", "active": true }, { "subscriptionType": "contact.propertyChange", "propertyName": "email", "active": true }, { "subscriptionType": "contact.associationChange", "active": true }, { "subscriptionType": "contact.merge", "active": true }, { "subscriptionType": "contact.restore", "active": true }, { "subscriptionType": "deal.creation", "active": true }, { "subscriptionType": "deal.deletion", "active": true }, { "subscriptionType": "deal.propertyChange", "propertyName": "dealname", "active": true }, { "subscriptionType": "deal.associationChange", "active": true }, { "subscriptionType": "deal.merge", "active": true }, { "subscriptionType": "deal.restore", "active": true }, { "subscriptionType": "ticket.creation", "active": true }, { "subscriptionType": "ticket.deletion", "active": true }, { "subscriptionType": "ticket.propertyChange", "propertyName": "subject", "active": true }, { "subscriptionType": "ticket.associationChange", "active": true }, { "subscriptionType": "ticket.merge", "active": true }, { "subscriptionType": "ticket.restore", "active": true }, { "subscriptionType": "product.creation", "active": true }, { "subscriptionType": "product.deletion", "active": true }, { "subscriptionType": "product.propertyChange", "propertyName": "name", "active": true }, { "subscriptionType": "product.merge", "active": true }, { "subscriptionType": "product.restore", "active": true }, { "subscriptionType": "line_item.creation", "active": true }, { "subscriptionType": "line_item.deletion", "active": true }, { "subscriptionType": "line_item.propertyChange", "propertyName": "quantity", "active": true }, { "subscriptionType": "line_item.associationChange", "active": true }, { "subscriptionType": "line_item.merge", "active": true }, { "subscriptionType": "line_item.restore", "active": true } ], "hubEvents": [ { "subscriptionType": "contact.privacyDeletion", "active": true }, { "subscriptionType": "conversation.creation", "active": true }, { "subscriptionType": "conversation.deletion", "active": true }, { "subscriptionType": "conversation.propertyChange", "propertyName": "status", "active": true }, { "subscriptionType": "conversation.privacyDeletion", "active": true }, { "subscriptionType": "conversation.newMessage", "active": true } ] } } }
Note: Subscribe only to the events your application needs — each entry above is optional.
propertyChangesubscriptions require apropertyName, and you can add one entry per property you want to monitor.contact.privacyDeletionand theconversation.*events are declared underhubEventsrather thanlegacyCrmObjects.
Upload the project to HubSpot:
hs project upload
Wait for both the build and deploy to succeed:
✔ Built hubspot-webhook-app #1 ✔ Deployed hubspot-webhook-app #1
Step 7: Retrieve the Client Secret
-
Open the project in the HubSpot portal:
hs project open -
Under Project Components, click the UID of your app.
-
Click the Auth tab.
-
Under Client credentials, copy the Client Secret.
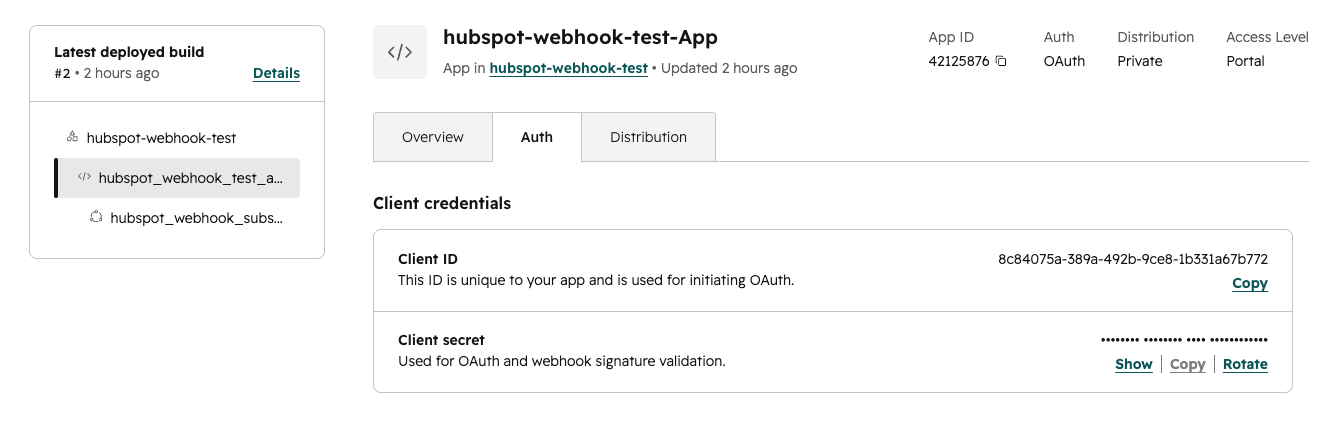
Save this value — you will need the Client Secret in the Quickstart section when initialising the Ballerina listener. This is the value the listener calls
webhookSecret.
Step 8: Install the App in Your Test Account
The app must be installed in a HubSpot account for that account's events to trigger webhooks.
-
Start the OAuth quickstart server in a new terminal. This handles the OAuth token exchange when the browser redirects to
localhost:3000:git clone https://github.com/HubSpot/oauth-quickstart-nodejs.git cd oauth-quickstart-nodejs npm installCreate a
.envfile in the project directory:CLIENT_ID=<YOUR_CLIENT_ID> CLIENT_SECRET=<YOUR_CLIENT_SECRET> SCOPES=oauth,crm.objects.contacts.read,crm.objects.contacts.write,crm.objects.companies.read,crm.objects.deals.read,tickets,e-commerce,conversations.readKeep this
SCOPESlist in sync with therequiredScopesyou chose in Step 5.Start the server:
npm start -
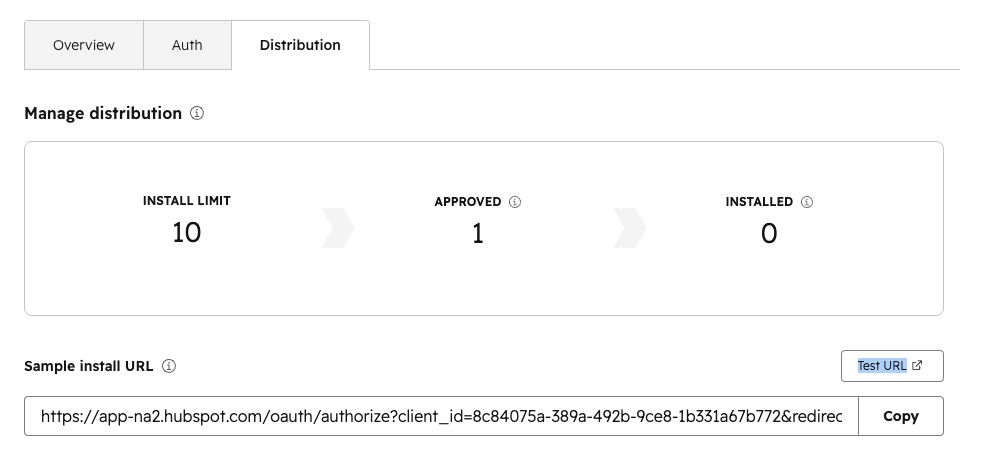
On your app's details page in the developer portal, go to the Distribution tab.
-
Click on Test URL, under Sample install URL.
-
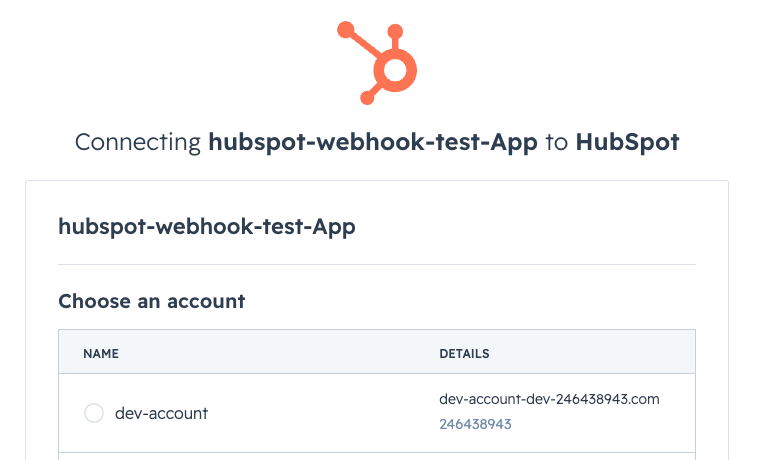
When prompted, select your developer test account as the account to install into.
-
After authorizing, the browser redirects to
http://localhost:3000. The page displays an access token and a sample contact name, confirming the installation was successful.
Production / business integration
The steps above use ngrok's temporary URL and a hardcoded secret, which are fine for local testing but not for a real deployment. For production use:
-
Deploy your Ballerina service somewhere with a stable, internet-reachable HTTPS URL. Ballerina doesn't require any specific hosting platform - containers, a VM, a managed PaaS, or anything else that gives you a stable HTTPS endpoint all work equally well.
-
In
src/app/webhooks/webhook-hsmeta.json(Step 6), settargetUrlto your production URL instead of the ngrok URL, then re-run.hs project upload -
Rather than hardcoding
webhookSecretas shown in the Quickstart, inject it viaConfig.toml(or your platform's equivalent configuration/secret mechanism), since it's aconfigurablevalue:[<your_org>.<your_module_name>.userInput] webhookSecret = "<your production Client Secret>" callbackUrl = "<your production URL>"callbackUrlmust exactly match thetargetUrlyou set in step 2 above - it's part of the signed payload HubSpot uses to compute the signature, so any mismatch makes verification fail for every request.
Compatibility
| Version | |
|---|---|
| Ballerina Language | Ballerina Swan Lake 2201.13.4 |
Quickstart
To use the HubSpot listener in your Ballerina application, update the .bal file as follows.
Before running the quickstart, ensure you have:
- The Client Secret from Step 7 of the Setup guide
- Your ngrok URL from Step 4 of the Setup guide
- ngrok running ()
ngrok http 8090 - The OAuth quickstart server running (in the
npm startoauth-quickstart-nodejsdirectory)
Step 1: Import listener
To import the ballerinax/hubspot.trigger module into the Ballerina project, add the following statement:
import ballerinax/hubspot.trigger as hubspot; import ballerina/io;
Step 2: Create a new listener instance
Add the following to your Config.toml file, replacing the placeholders with the values saved during the Setup guide:
webhookSecret = "<YOUR_CLIENT_SECRET>" callbackUrl = "<YOUR_NGROK_URL>"
Then initialise the listener in your .bal file:
configurable string webhookSecret = ?; configurable string callbackUrl = ?; listener hubspot:Listener hubspotWebhook = new ( {webhookSecret, callbackUrl}, 8090 );
webhookSecret and callbackUrl should always match the Client Secret and public webhook URL
configured on the HubSpot app - this is what the listener uses to verify incoming payloads
actually came from HubSpot (HubSpot's v3 signature scheme signs the exact callback URL, so it
must match exactly, including scheme, host, path, and query string).
Step 3: Invoke listener triggers
Now let's use the triggers available within the listener.
For example, you can configure the Ballerina listener to listen to company creation and deletion events as follows:
Listen to HubSpot Company Creation and Deletion
A service attached to one of the listener's service types must implement all of that type's remote functions. For example, CompanyService exposes six:
service hubspot:CompanyService on hubspotWebhook { remote function onCompanyCreation(hubspot:WebhookEvent payload) returns error? { io:println(payload); } remote function onCompanyDeletion(hubspot:WebhookEvent payload) returns error? { io:println(payload); } remote function onCompanyPropertyChange(hubspot:WebhookEvent payload) returns error? { io:println(payload); } remote function onCompanyAssociationChange(hubspot:WebhookEvent payload) returns error? { io:println(payload); } remote function onCompanyMerge(hubspot:WebhookEvent payload) returns error? { io:println(payload); } remote function onCompanyRestore(hubspot:WebhookEvent payload) returns error? { io:println(payload); } }
Note: The event payload does not contain metadata related to the event. You need to use the specific HubSpot client to obtain it.
To compile and run the Ballerina program, issue the following command:
bal run
To verify it is working, go to your HubSpot test account and create or delete a Contact, Company, or Deal. You should see the event printed in the Ballerina console output.

Examples
The hubspot.trigger module provides practical examples illustrating usage in various scenarios.
Explore these examples,
covering common webhook event handling use cases.
Report issues
To report bugs, request new features, start new discussions, etc., go to the Ballerina Library repository
Useful links
- For more information go to the
hubspot.triggerpackage. - If you're upgrading from an older version, see the migration notes for renamed functions and other breaking changes.
- For example demonstrations of the usage, go to Ballerina By Examples.
- Chat live with us via our Discord server.
- Post all technical questions on Stack Overflow with the #ballerina tag.
Service types
hubspot.trigger: TicketService
Attachable service type exposing the TicketService family of webhook events.
onTicketPropertyChange
function onTicketPropertyChange(WebhookEvent payload) returns error?Triggered on Ticket property change.
Parameters
- payload WebhookEvent - the WebhookEvent webhook payload
Return Type
- error? - an error if handling the event fails
onTicketDeletion
function onTicketDeletion(WebhookEvent payload) returns error?Triggered on Ticket deletion.
Parameters
- payload WebhookEvent - the WebhookEvent webhook payload
Return Type
- error? - an error if handling the event fails
onTicketCreation
function onTicketCreation(WebhookEvent payload) returns error?Triggered on Ticket creation.
Parameters
- payload WebhookEvent - the WebhookEvent webhook payload
Return Type
- error? - an error if handling the event fails
onTicketMerge
function onTicketMerge(WebhookEvent payload) returns error?Triggered on Ticket merge.
Parameters
- payload WebhookEvent - the WebhookEvent webhook payload
Return Type
- error? - an error if handling the event fails
onTicketRestore
function onTicketRestore(WebhookEvent payload) returns error?Triggered on Ticket restore.
Parameters
- payload WebhookEvent - the WebhookEvent webhook payload
Return Type
- error? - an error if handling the event fails
onTicketAssociationChange
function onTicketAssociationChange(WebhookEvent payload) returns error?Triggered on Ticket association change.
Parameters
- payload WebhookEvent - the WebhookEvent webhook payload
Return Type
- error? - an error if handling the event fails
hubspot.trigger: CompanyService
Attachable service type exposing the CompanyService family of webhook events.
onCompanyDeletion
function onCompanyDeletion(WebhookEvent payload) returns error?Triggered on Company deletion.
Parameters
- payload WebhookEvent - the WebhookEvent webhook payload
Return Type
- error? - an error if handling the event fails
onCompanyRestore
function onCompanyRestore(WebhookEvent payload) returns error?Triggered on Company restore.
Parameters
- payload WebhookEvent - the WebhookEvent webhook payload
Return Type
- error? - an error if handling the event fails
onCompanyMerge
function onCompanyMerge(WebhookEvent payload) returns error?Triggered on Company merge.
Parameters
- payload WebhookEvent - the WebhookEvent webhook payload
Return Type
- error? - an error if handling the event fails
onCompanyPropertyChange
function onCompanyPropertyChange(WebhookEvent payload) returns error?Triggered on Company property change.
Parameters
- payload WebhookEvent - the WebhookEvent webhook payload
Return Type
- error? - an error if handling the event fails
onCompanyCreation
function onCompanyCreation(WebhookEvent payload) returns error?Triggered on Company creation.
Parameters
- payload WebhookEvent - the WebhookEvent webhook payload
Return Type
- error? - an error if handling the event fails
onCompanyAssociationChange
function onCompanyAssociationChange(WebhookEvent payload) returns error?Triggered on Company association change.
Parameters
- payload WebhookEvent - the WebhookEvent webhook payload
Return Type
- error? - an error if handling the event fails
hubspot.trigger: LineItemService
Attachable service type exposing the LineItemService family of webhook events.
onLineItemMerge
function onLineItemMerge(WebhookEvent payload) returns error?Triggered on Line item merge.
Parameters
- payload WebhookEvent - the WebhookEvent webhook payload
Return Type
- error? - an error if handling the event fails
onLineItemDeletion
function onLineItemDeletion(WebhookEvent payload) returns error?Triggered on Line item deletion.
Parameters
- payload WebhookEvent - the WebhookEvent webhook payload
Return Type
- error? - an error if handling the event fails
onLineItemPropertyChange
function onLineItemPropertyChange(WebhookEvent payload) returns error?Triggered on Line item property change.
Parameters
- payload WebhookEvent - the WebhookEvent webhook payload
Return Type
- error? - an error if handling the event fails
onLineItemRestore
function onLineItemRestore(WebhookEvent payload) returns error?Triggered on Line item restore.
Parameters
- payload WebhookEvent - the WebhookEvent webhook payload
Return Type
- error? - an error if handling the event fails
onLineItemAssociationChange
function onLineItemAssociationChange(WebhookEvent payload) returns error?Triggered on Line item association change.
Parameters
- payload WebhookEvent - the WebhookEvent webhook payload
Return Type
- error? - an error if handling the event fails
onLineItemCreation
function onLineItemCreation(WebhookEvent payload) returns error?Triggered on Line item creation.
Parameters
- payload WebhookEvent - the WebhookEvent webhook payload
Return Type
- error? - an error if handling the event fails
hubspot.trigger: ProductService
Attachable service type exposing the ProductService family of webhook events.
onProductPropertyChange
function onProductPropertyChange(WebhookEvent payload) returns error?Triggered on Product property change.
Parameters
- payload WebhookEvent - the WebhookEvent webhook payload
Return Type
- error? - an error if handling the event fails
onProductDeletion
function onProductDeletion(WebhookEvent payload) returns error?Triggered on Product deletion.
Parameters
- payload WebhookEvent - the WebhookEvent webhook payload
Return Type
- error? - an error if handling the event fails
onProductMerge
function onProductMerge(WebhookEvent payload) returns error?Triggered on Product merge.
Parameters
- payload WebhookEvent - the WebhookEvent webhook payload
Return Type
- error? - an error if handling the event fails
onProductRestore
function onProductRestore(WebhookEvent payload) returns error?Triggered on Product restore.
Parameters
- payload WebhookEvent - the WebhookEvent webhook payload
Return Type
- error? - an error if handling the event fails
onProductCreation
function onProductCreation(WebhookEvent payload) returns error?Triggered on Product creation.
Parameters
- payload WebhookEvent - the WebhookEvent webhook payload
Return Type
- error? - an error if handling the event fails
hubspot.trigger: ConversationService
Attachable service type exposing the ConversationService family of webhook events.
onConversationCreation
function onConversationCreation(WebhookEvent payload) returns error?Triggered on Conversation creation.
Parameters
- payload WebhookEvent - the WebhookEvent webhook payload
Return Type
- error? - an error if handling the event fails
onConversationPropertyChange
function onConversationPropertyChange(WebhookEvent payload) returns error?Triggered on Conversation property change.
Parameters
- payload WebhookEvent - the WebhookEvent webhook payload
Return Type
- error? - an error if handling the event fails
onConversationPrivacyDeletion
function onConversationPrivacyDeletion(WebhookEvent payload) returns error?Triggered on Conversation privacy deletion.
Parameters
- payload WebhookEvent - the WebhookEvent webhook payload
Return Type
- error? - an error if handling the event fails
onConversationNewMessage
function onConversationNewMessage(WebhookEvent payload) returns error?Triggered on Conversation new message.
Parameters
- payload WebhookEvent - the WebhookEvent webhook payload
Return Type
- error? - an error if handling the event fails
onConversationDeletion
function onConversationDeletion(WebhookEvent payload) returns error?Triggered on Conversation deletion.
Parameters
- payload WebhookEvent - the WebhookEvent webhook payload
Return Type
- error? - an error if handling the event fails
hubspot.trigger: DealService
Attachable service type exposing the DealService family of webhook events.
onDealDeletion
function onDealDeletion(WebhookEvent payload) returns error?Triggered on Deal deletion.
Parameters
- payload WebhookEvent - the WebhookEvent webhook payload
Return Type
- error? - an error if handling the event fails
onDealCreation
function onDealCreation(WebhookEvent payload) returns error?Triggered on Deal creation.
Parameters
- payload WebhookEvent - the WebhookEvent webhook payload
Return Type
- error? - an error if handling the event fails
onDealMerge
function onDealMerge(WebhookEvent payload) returns error?Triggered on Deal merge.
Parameters
- payload WebhookEvent - the WebhookEvent webhook payload
Return Type
- error? - an error if handling the event fails
onDealPropertyChange
function onDealPropertyChange(WebhookEvent payload) returns error?Triggered on Deal property change.
Parameters
- payload WebhookEvent - the WebhookEvent webhook payload
Return Type
- error? - an error if handling the event fails
onDealRestore
function onDealRestore(WebhookEvent payload) returns error?Triggered on Deal restore.
Parameters
- payload WebhookEvent - the WebhookEvent webhook payload
Return Type
- error? - an error if handling the event fails
onDealAssociationChange
function onDealAssociationChange(WebhookEvent payload) returns error?Triggered on Deal association change.
Parameters
- payload WebhookEvent - the WebhookEvent webhook payload
Return Type
- error? - an error if handling the event fails
hubspot.trigger: ContactService
Attachable service type exposing the ContactService family of webhook events.
onContactCreation
function onContactCreation(WebhookEvent payload) returns error?Triggered on Contact creation.
Parameters
- payload WebhookEvent - the WebhookEvent webhook payload
Return Type
- error? - an error if handling the event fails
onContactAssociationChange
function onContactAssociationChange(WebhookEvent payload) returns error?Triggered on Contact association change.
Parameters
- payload WebhookEvent - the WebhookEvent webhook payload
Return Type
- error? - an error if handling the event fails
onContactDeletion
function onContactDeletion(WebhookEvent payload) returns error?Triggered on Contact deletion.
Parameters
- payload WebhookEvent - the WebhookEvent webhook payload
Return Type
- error? - an error if handling the event fails
onContactPrivacyDeletion
function onContactPrivacyDeletion(WebhookEvent payload) returns error?Triggered on Contact privacy deletion.
Parameters
- payload WebhookEvent - the WebhookEvent webhook payload
Return Type
- error? - an error if handling the event fails
onContactPropertyChange
function onContactPropertyChange(WebhookEvent payload) returns error?Triggered on Contact property change.
Parameters
- payload WebhookEvent - the WebhookEvent webhook payload
Return Type
- error? - an error if handling the event fails
onContactMerge
function onContactMerge(WebhookEvent payload) returns error?Triggered on Contact merge.
Parameters
- payload WebhookEvent - the WebhookEvent webhook payload
Return Type
- error? - an error if handling the event fails
onContactRestore
function onContactRestore(WebhookEvent payload) returns error?Triggered on Contact restore.
Parameters
- payload WebhookEvent - the WebhookEvent webhook payload
Return Type
- error? - an error if handling the event fails
Listeners
hubspot.trigger: Listener
attach
function attach(GenericServiceType serviceRef, () attachPoint) returns error?detach
function detach(GenericServiceType serviceRef) returns error?Parameters
- serviceRef GenericServiceType -
'start
function 'start() returns error?gracefulStop
function gracefulStop() returns error?immediateStop
function immediateStop() returns error?Records
hubspot.trigger: ListenerConfig
Configuration for the webhook listener, including the secret used to verify incoming requests.
Fields
- webhookSecret? string - The secret used to verify incoming webhook signatures.
- callbackUrl string(default "") - Configurable value referenced by the webhook signature verification DSL (
$config('callbackUrl')).
hubspot.trigger: WebhookEvent
A single webhook notification HubSpot sends when a subscribed CRM event occurs (property change, association change, merge, or new conversation message).
Fields
- eventId int - The ID of the event that triggered this notification. This value is not guaranteed to be unique.
- subscriptionId? int - The ID of the subscription that triggered a notification about the event.
- portalId? int - The customer's (HubSpot account ID)[https://knowledge.hubspot.com/account/manage-multiple-hubspot-accounts?_ga=2.56562472.2054080341.1656611011-2068059512.1656469161#check-your-current-account] where the event occurred.
- appId? int - The ID of the HubSpot application
- occurredAt? int - When this event occurred as a millisecond timestamp.
- subscriptionType? string - Type of the event
- attemptNumber? int - Starting at 0, which number attempt this is to notify your service of this event. If your service times-out or throws an error as describe in the Retries section below, HubSpot will attempt to send the notification again.
- objectId? int - The ID of the object that was created, changed, or deleted. For contacts this is the contact ID; for companies, the company ID; for deals, the deal ID; and for conversations the thread ID
- changeSource? string - The source of the change. This can be any of the change sources that appear in contact property histories.
- sourceId? string - The ID of the source of the change. The format depends on the change source (for example, "userId:12345" for changes made by a user in the CRM UI).
- changeFlag? string - Flag of the change.
- propertyName? string - The name of the property changed. Present for propertyChange events.
- propertyValue? string - The new value set for the property that triggered the notification. Present for propertyChange events.
- associationType? string - The type of the association (e.g. CONTACT_TO_COMPANY, DEAL_TO_LINE_ITEM). Present for associationChange events.
- fromObjectId? int - The ID of the record that the association change was made from. Present for associationChange events.
- toObjectId? int - The ID of the secondary record in the association event. Present for associationChange events.
- associationRemoved? boolean - Whether the association was removed (true) or added (false). Present for associationChange events.
- isPrimaryAssociation? boolean - Whether the secondary record is the primary association. Present for associationChange events.
- primaryObjectId? int - The ID of the merge winner, which is the record that remains after the merge. Present for merge events.
- mergedObjectIds? int[] - An array of IDs that represent the records merged into the winner. Present for merge events.
- newObjectId? int - The ID of the record created as a result of the merge. Present for merge events.
- numberOfPropertiesMoved? int - How many properties were transferred during the merge. Present for merge events.
- messageId? int - The ID of the new message. Present for conversation.newMessage events.
- messageType? string - The type of the new message, either MESSAGE or COMMENT. Present for conversation.newMessage events.
- json... - Rest field
Union types
hubspot.trigger: GenericServiceType
GenericServiceType
The union of every service type that can be attached to this listener.
Simple name reference types
hubspot.trigger: GenericDataType
GenericDataType
The union of every possible webhook payload type this listener can receive.
Import
import ballerinax/hubspot.trigger;Other versions
0.12.0