Module hubspot.marketing.forms

ballerinax/hubspot.marketing.forms Ballerina library
Overview
HubSpot is an AI-powered customer relationship management (CRM) platform.
The hubspot.marketing.forms offers APIs to connect and interact with the Marketing Forms endpoints, specifically based on the HubSpot REST API.
Note: This package may be changed in the future based on the HubSpot API changes, since it is currently under development and is subject to change based on testing and feedback. By using this package, you are agreeing to accept any future changes that might occur and understand the risk associated with testing an unstable API. Refer to the HubSpot Developer Terms & Developer Beta Terms for more information.
Setup guide
To use the HubSpot Marketing Forms connector, you must have access to the HubSpot API through a HubSpot developer account and a HubSpot App under it. Therefore you need to register for a developer account at HubSpot if you don't have one already.
Step 1: Create/Login to a HubSpot Developer Account
If you have an account already, go to the HubSpot developer portal
If you don't have a HubSpot Developer Account you can sign up to a free account here
Step 2 (Optional): Create a Developer Test Account
Within app developer accounts, you can create developer test account under your account to test apps and integrations without affecting any real HubSpot data.
Note: These accounts are only for development and testing purposes. In production you should not use Developer Test Accounts.
- Go to Test accounts section from the left sidebar.
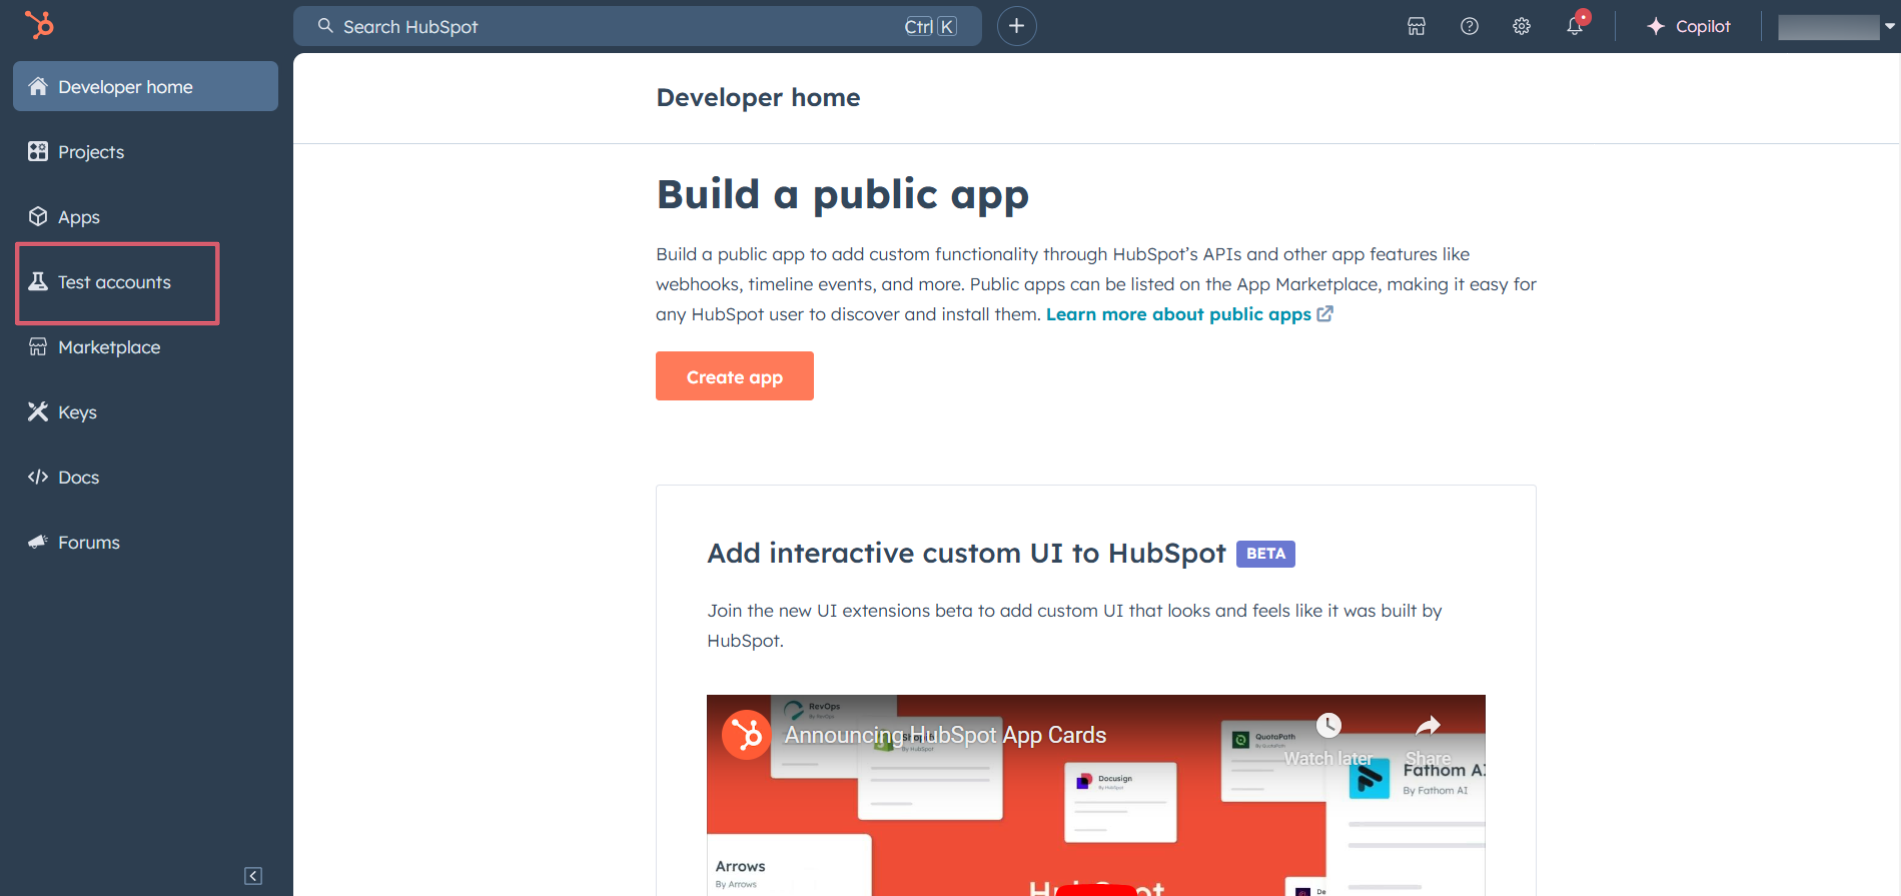
- Click on the "Create developer test account" button on the top right corner.
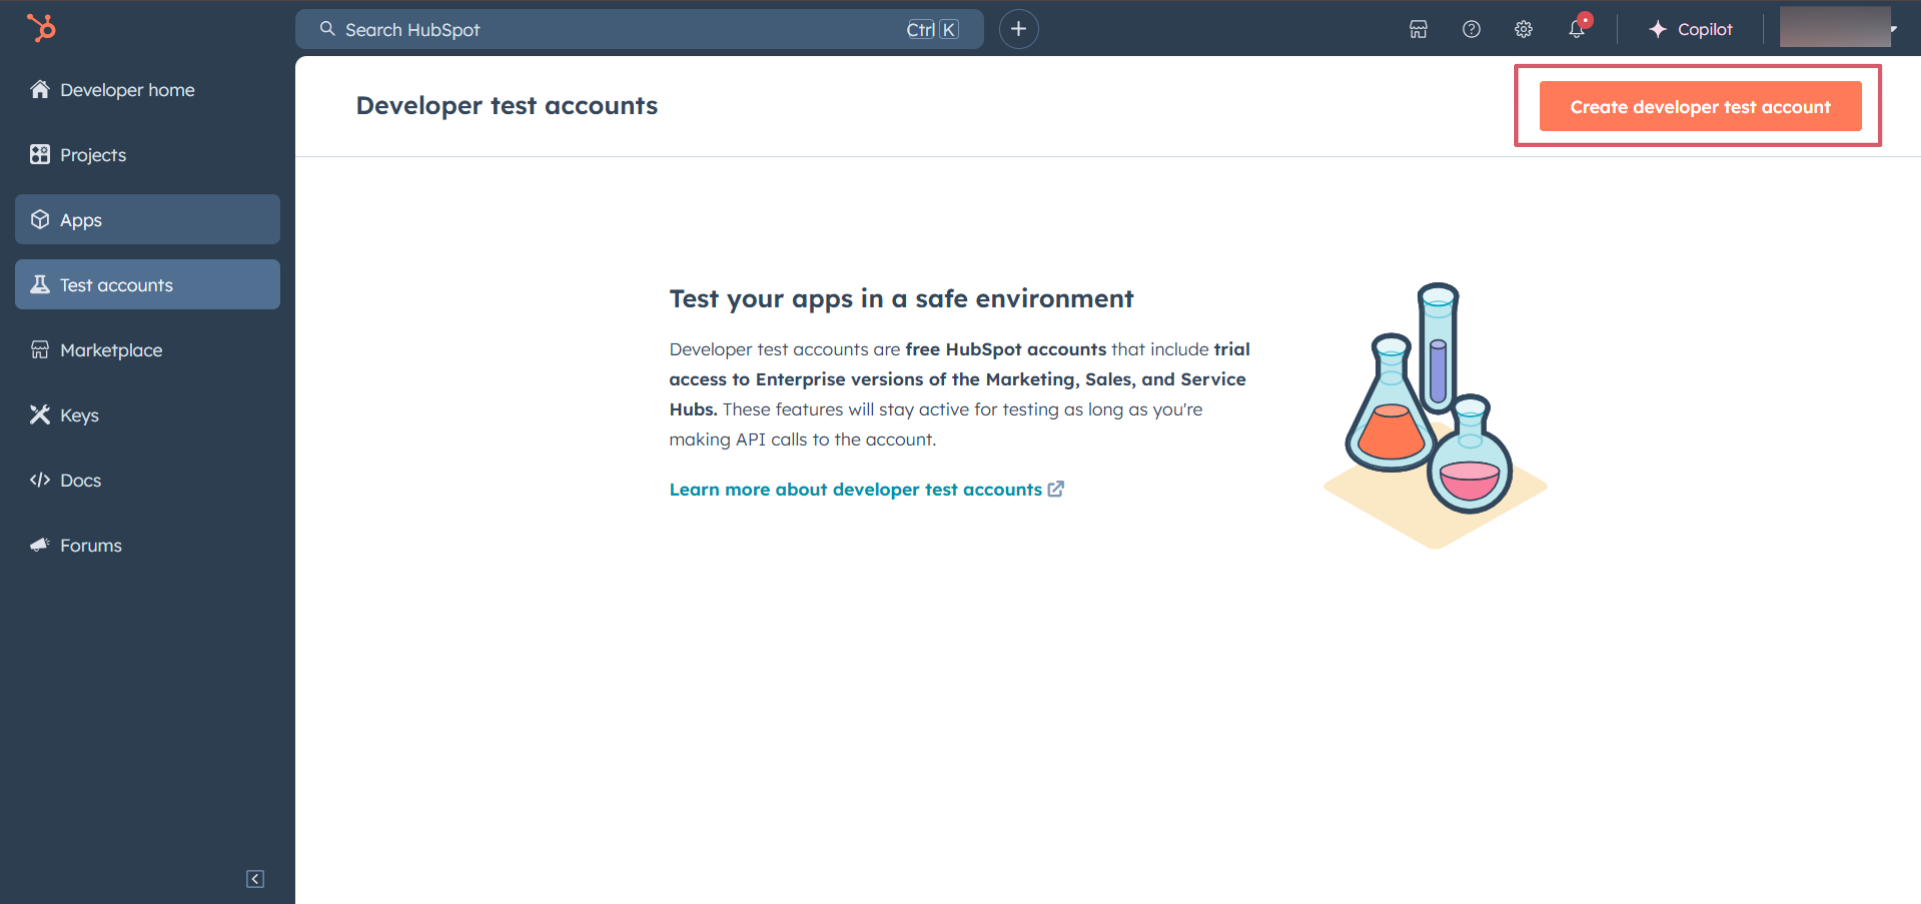
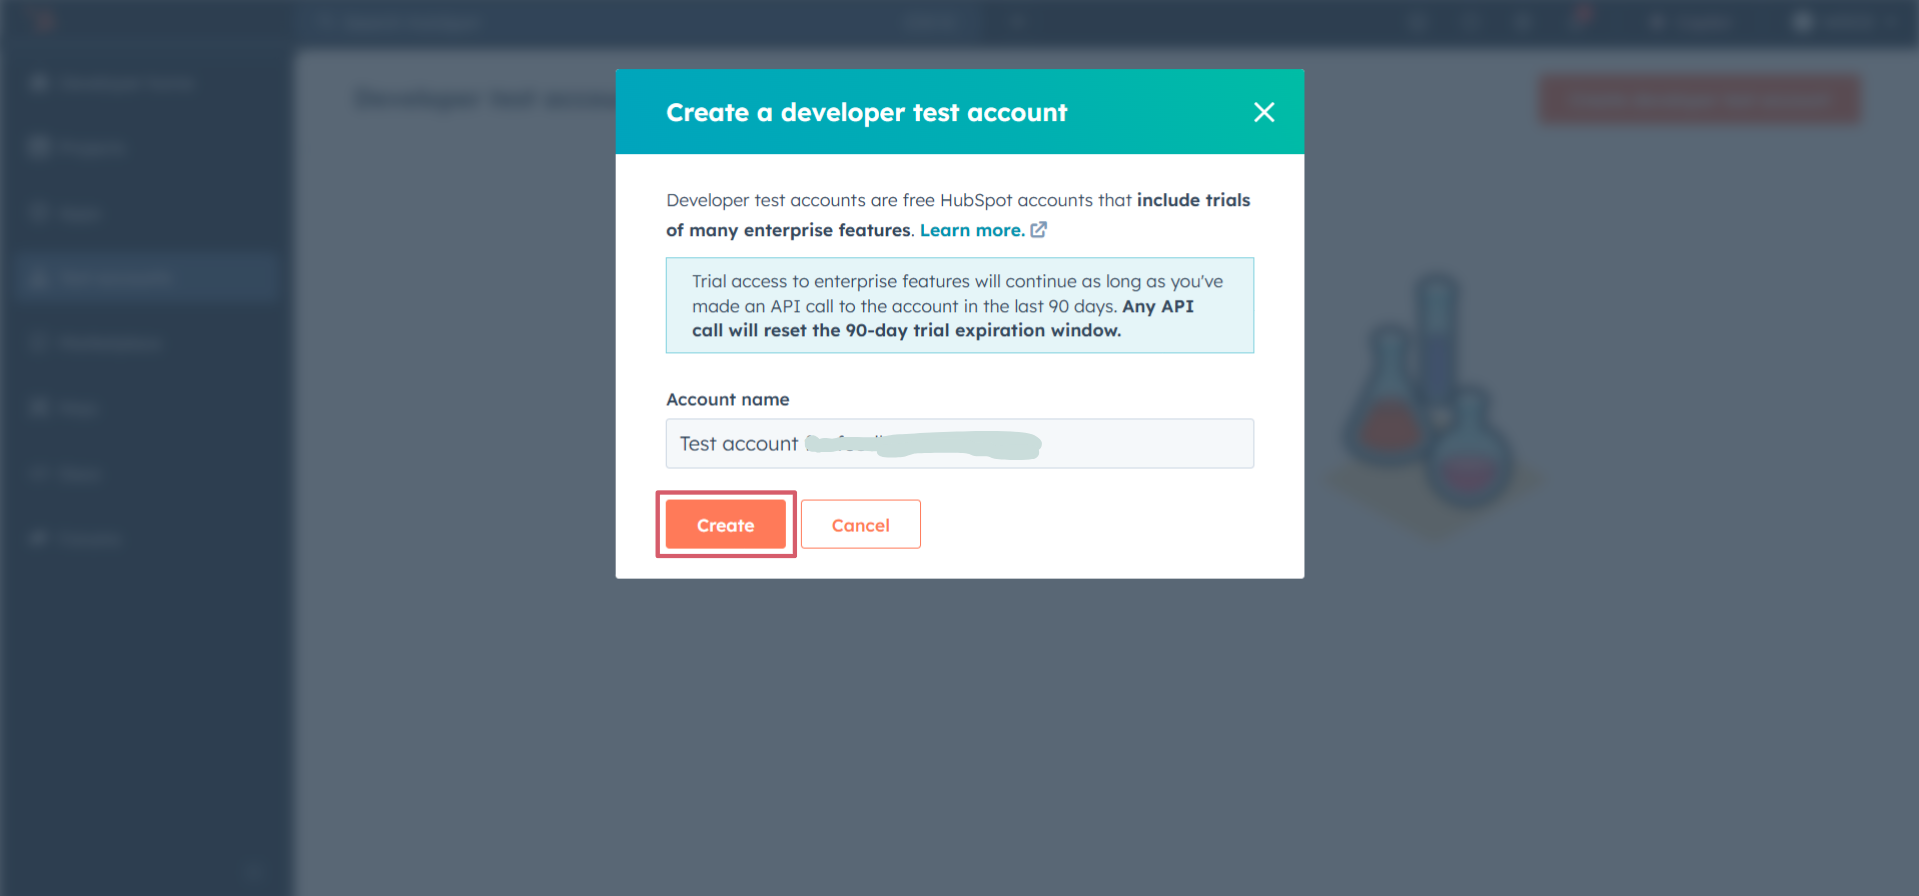
- In the pop-up window, provide a name for the test account and click on the "Create" button.
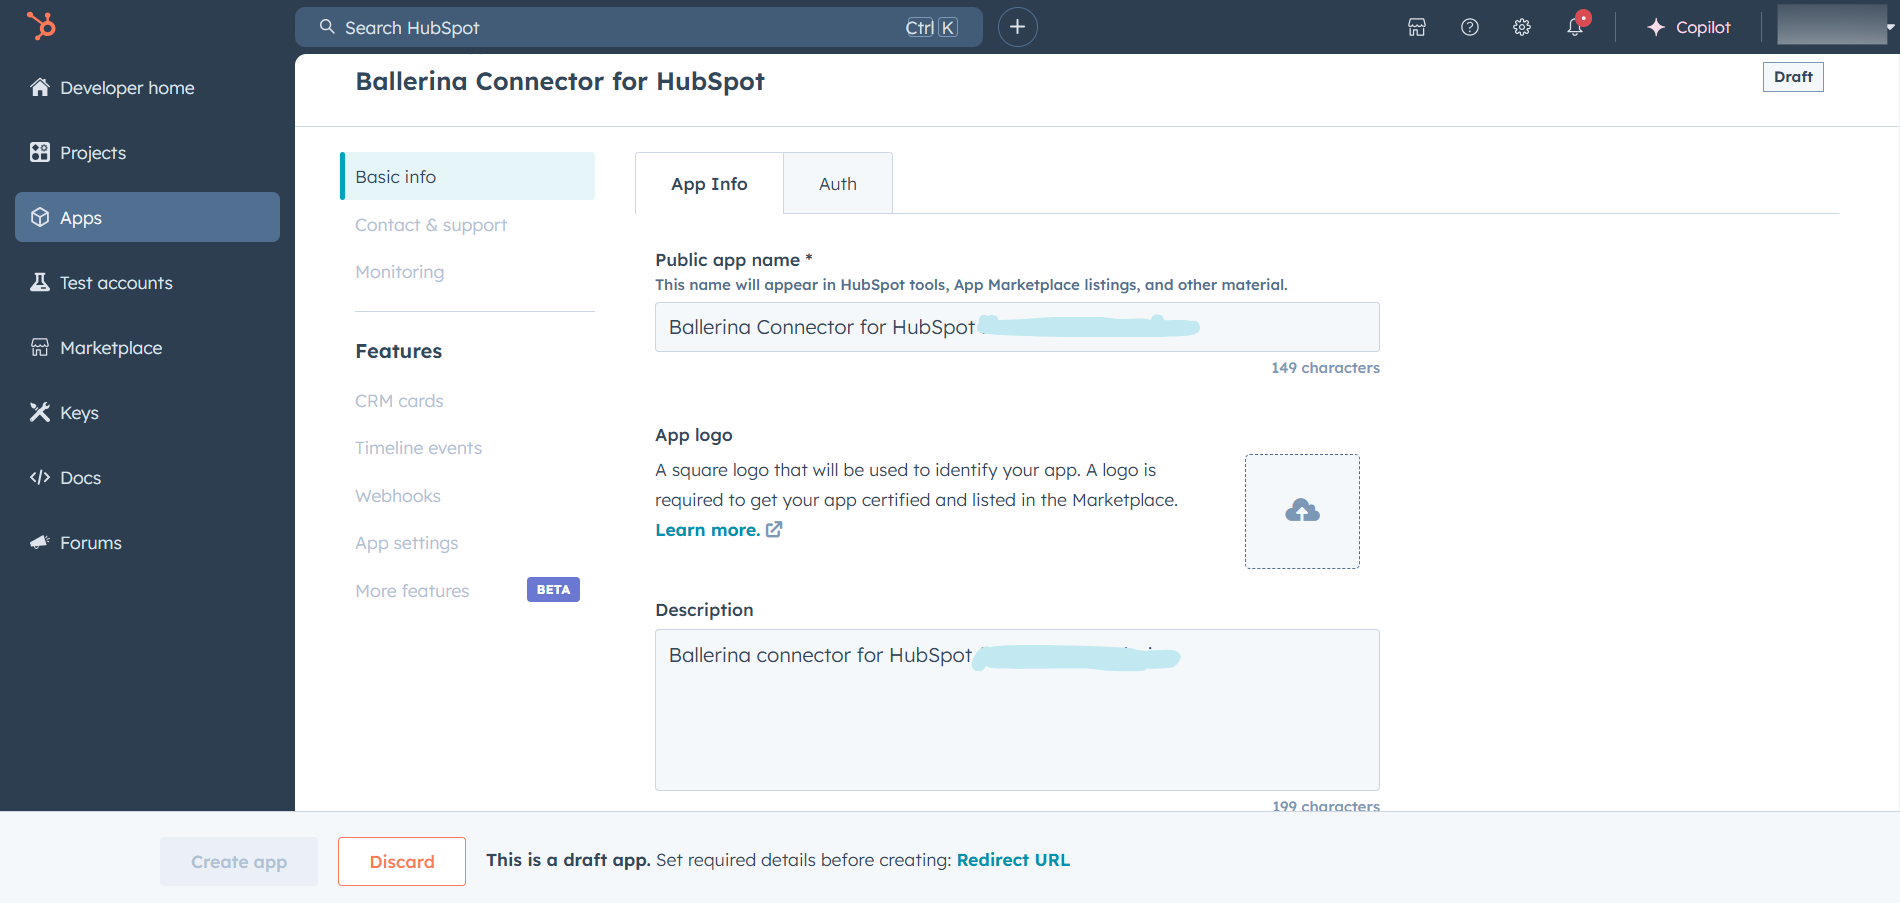
Step 3: Create a HubSpot App
- Now navigate to the "Apps" section from the left sidebar and click on the "Create app" button on the top right corner.
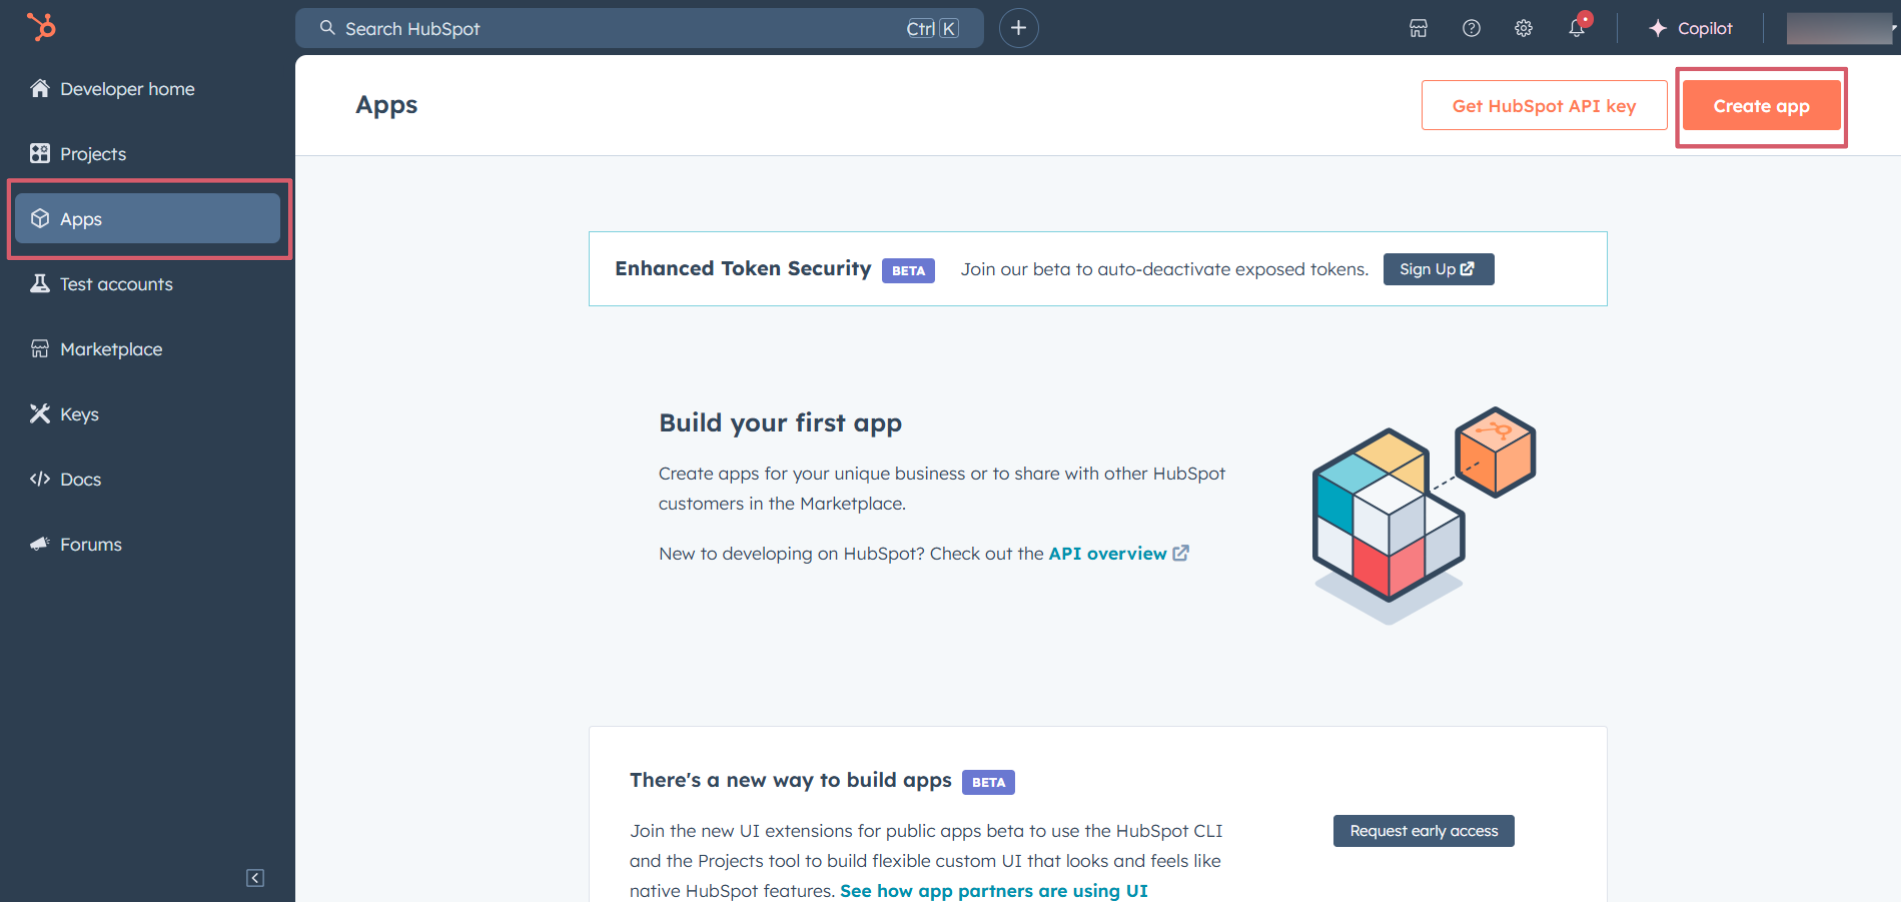
- Provide a public app name and description for your app.
Step 4: Configure the Authentication Flow
- Move to the "Auth" tab.
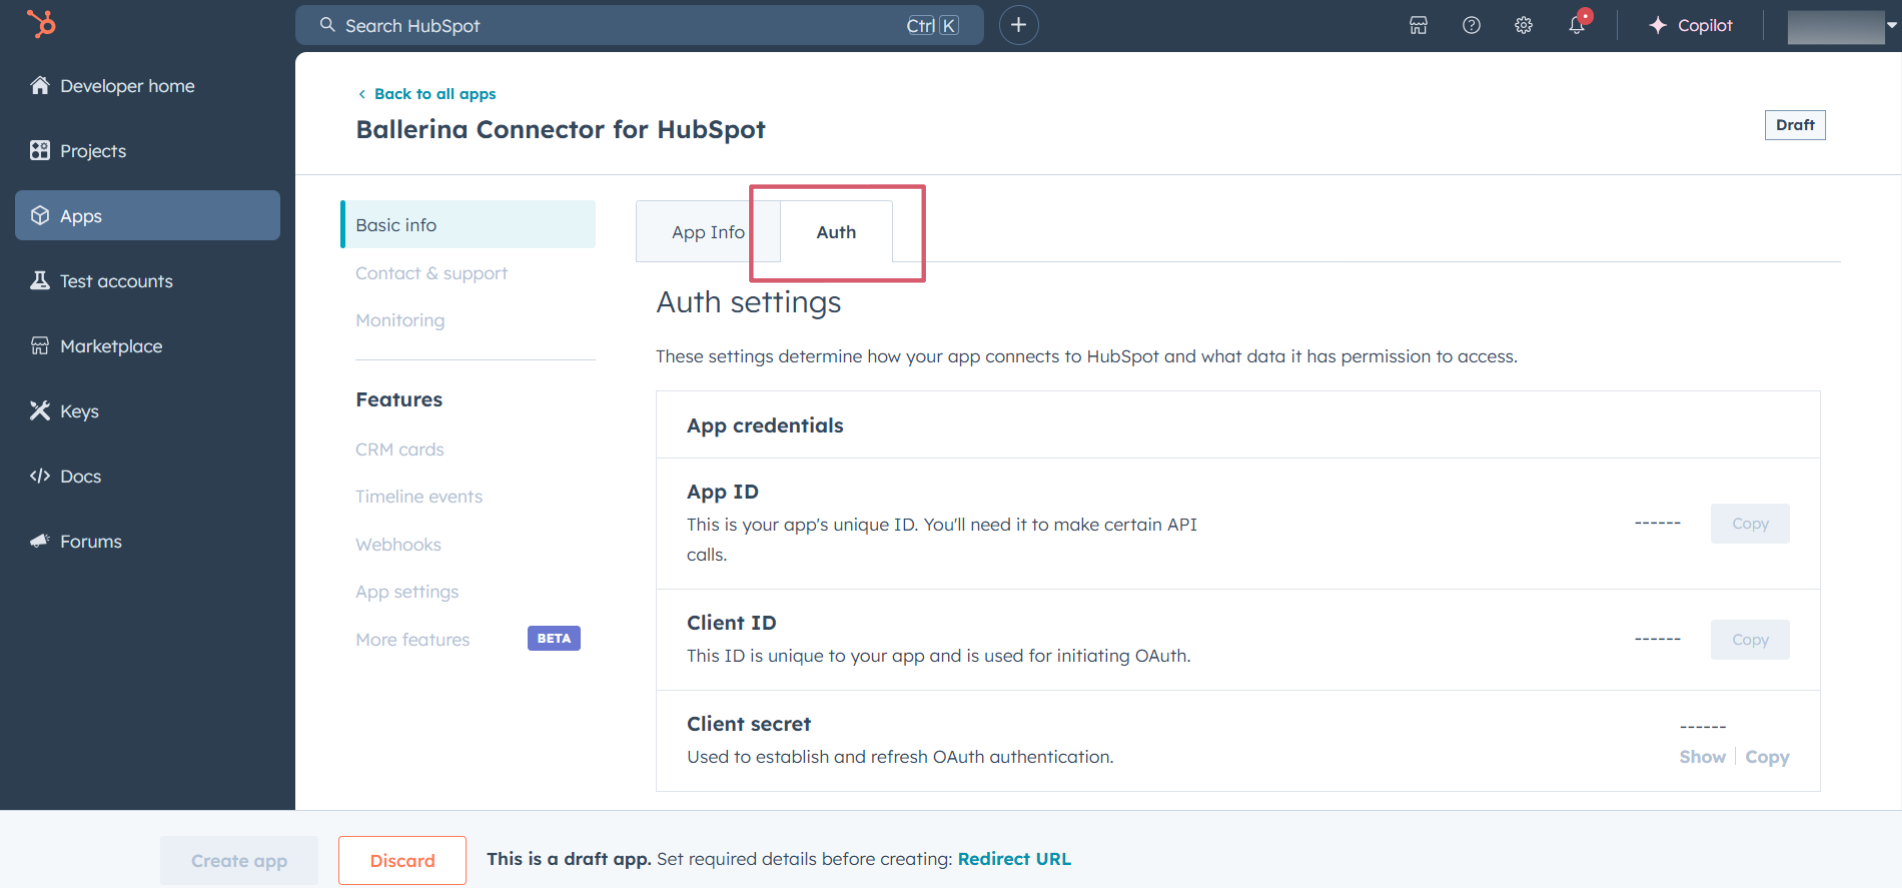
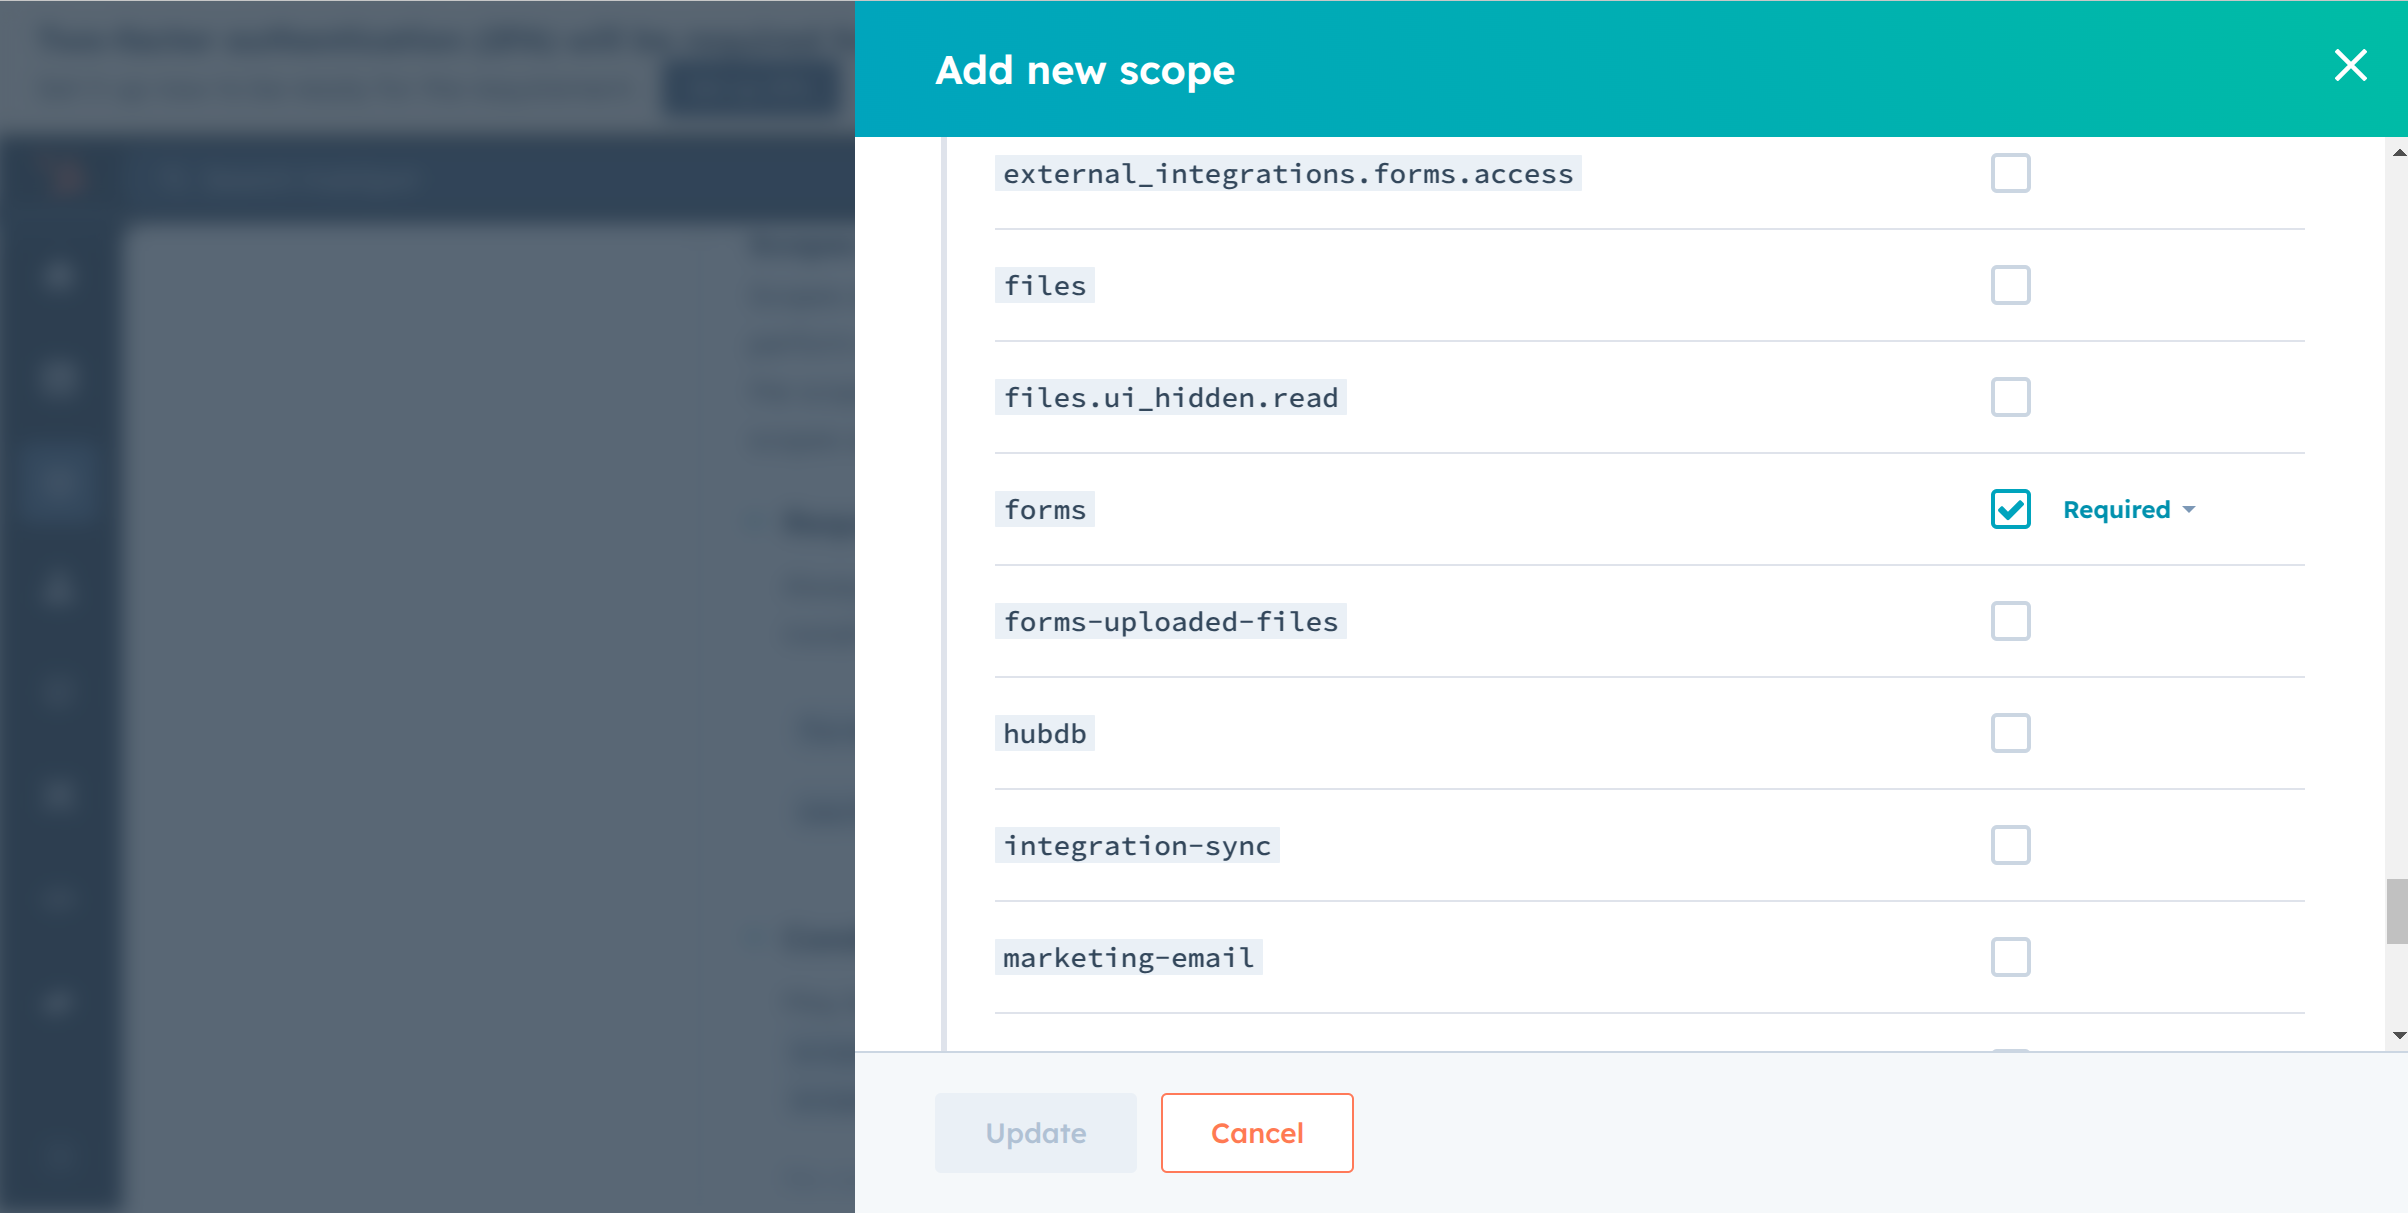
- In the "Scopes" section, add the following scopes for your app using the "Add new scopes" button.
forms
- In the "Redirect URL" section, add the redirect URL for your app. This is the URL where the user will be redirected after the authentication process. You can also use
localhostaddresses for local development purposes. Then click the "Create App" button.

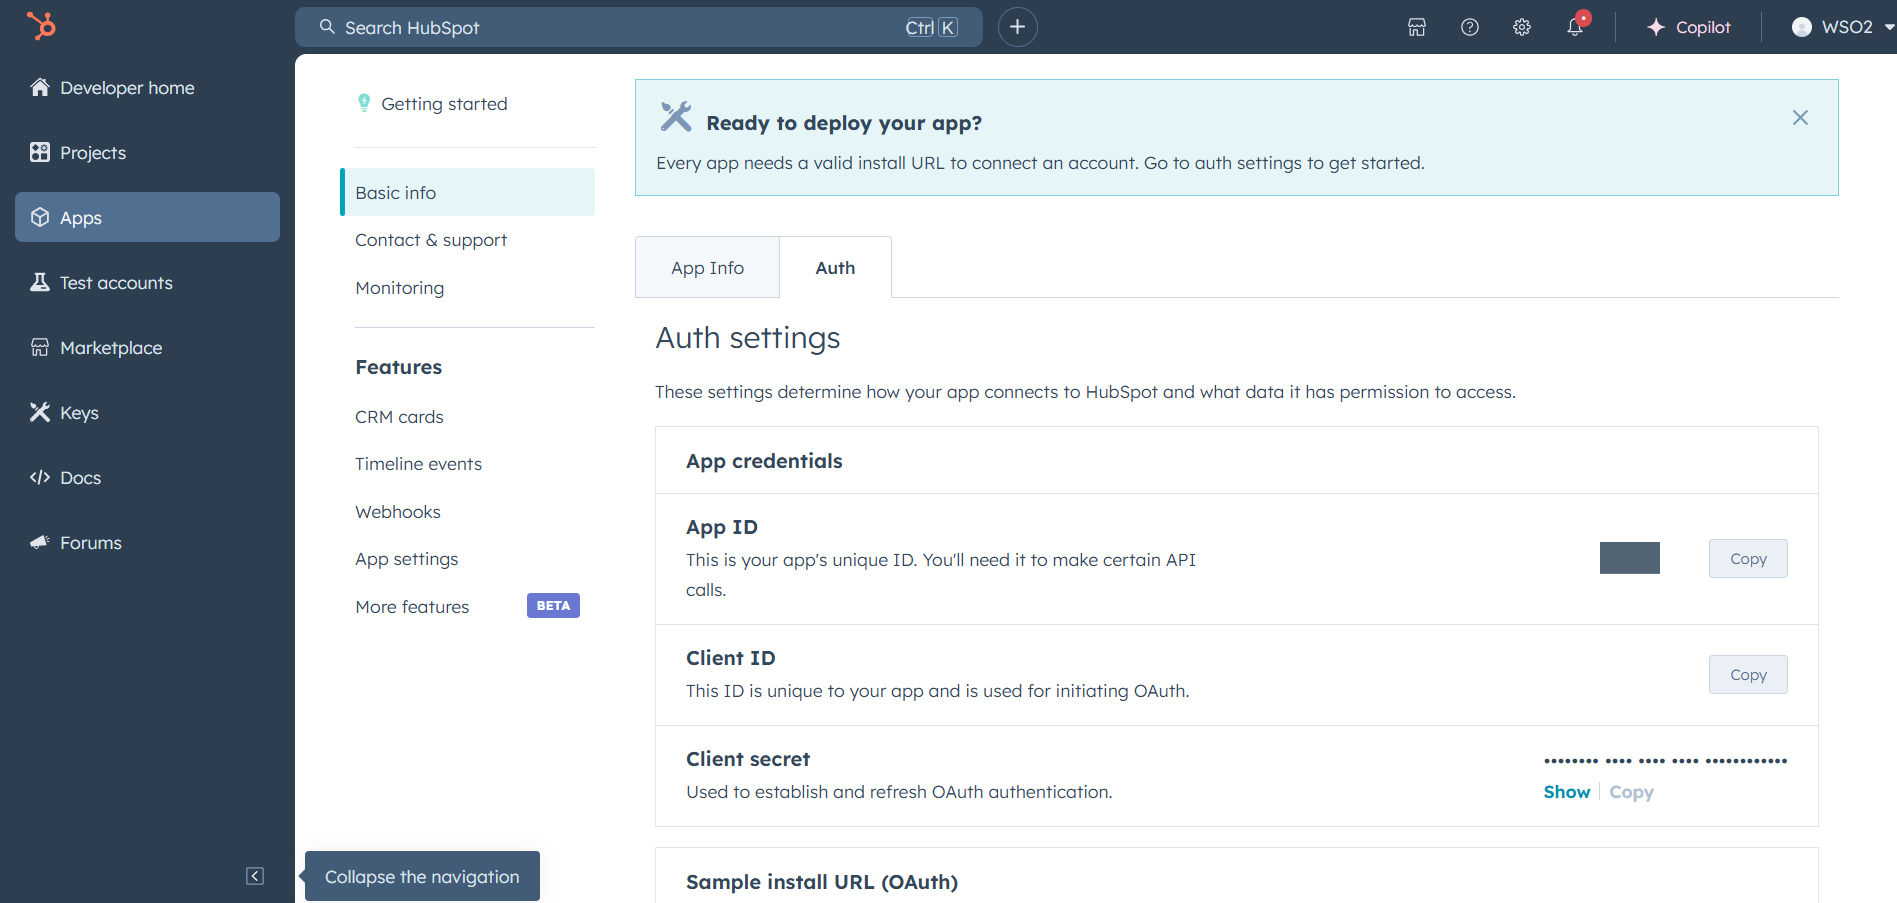
Step 5: Get the Client ID and Client Secret
Navigate to the "Auth" tab and you will see the Client ID and Client Secret for your app. Make sure to save these values.
Step 6: Setup Authentication Flow
Before proceeding with the Quickstart, ensure you have obtained the Access Token using the following steps:
-
Create an authorization URL using the following format:
https://app.hubspot.com/oauth/authorize?client_id=<YOUR_CLIENT_ID>&scope=<YOUR_SCOPES>&redirect_uri=<YOUR_REDIRECT_URI>Replace the
<YOUR_CLIENT_ID>,<YOUR_REDIRECT_URI>and<YOUR_SCOPES>with your specific value.
Note: If you are using a
localhostredirect url, make sure to have a listener running at the relevant port before executing the next step.
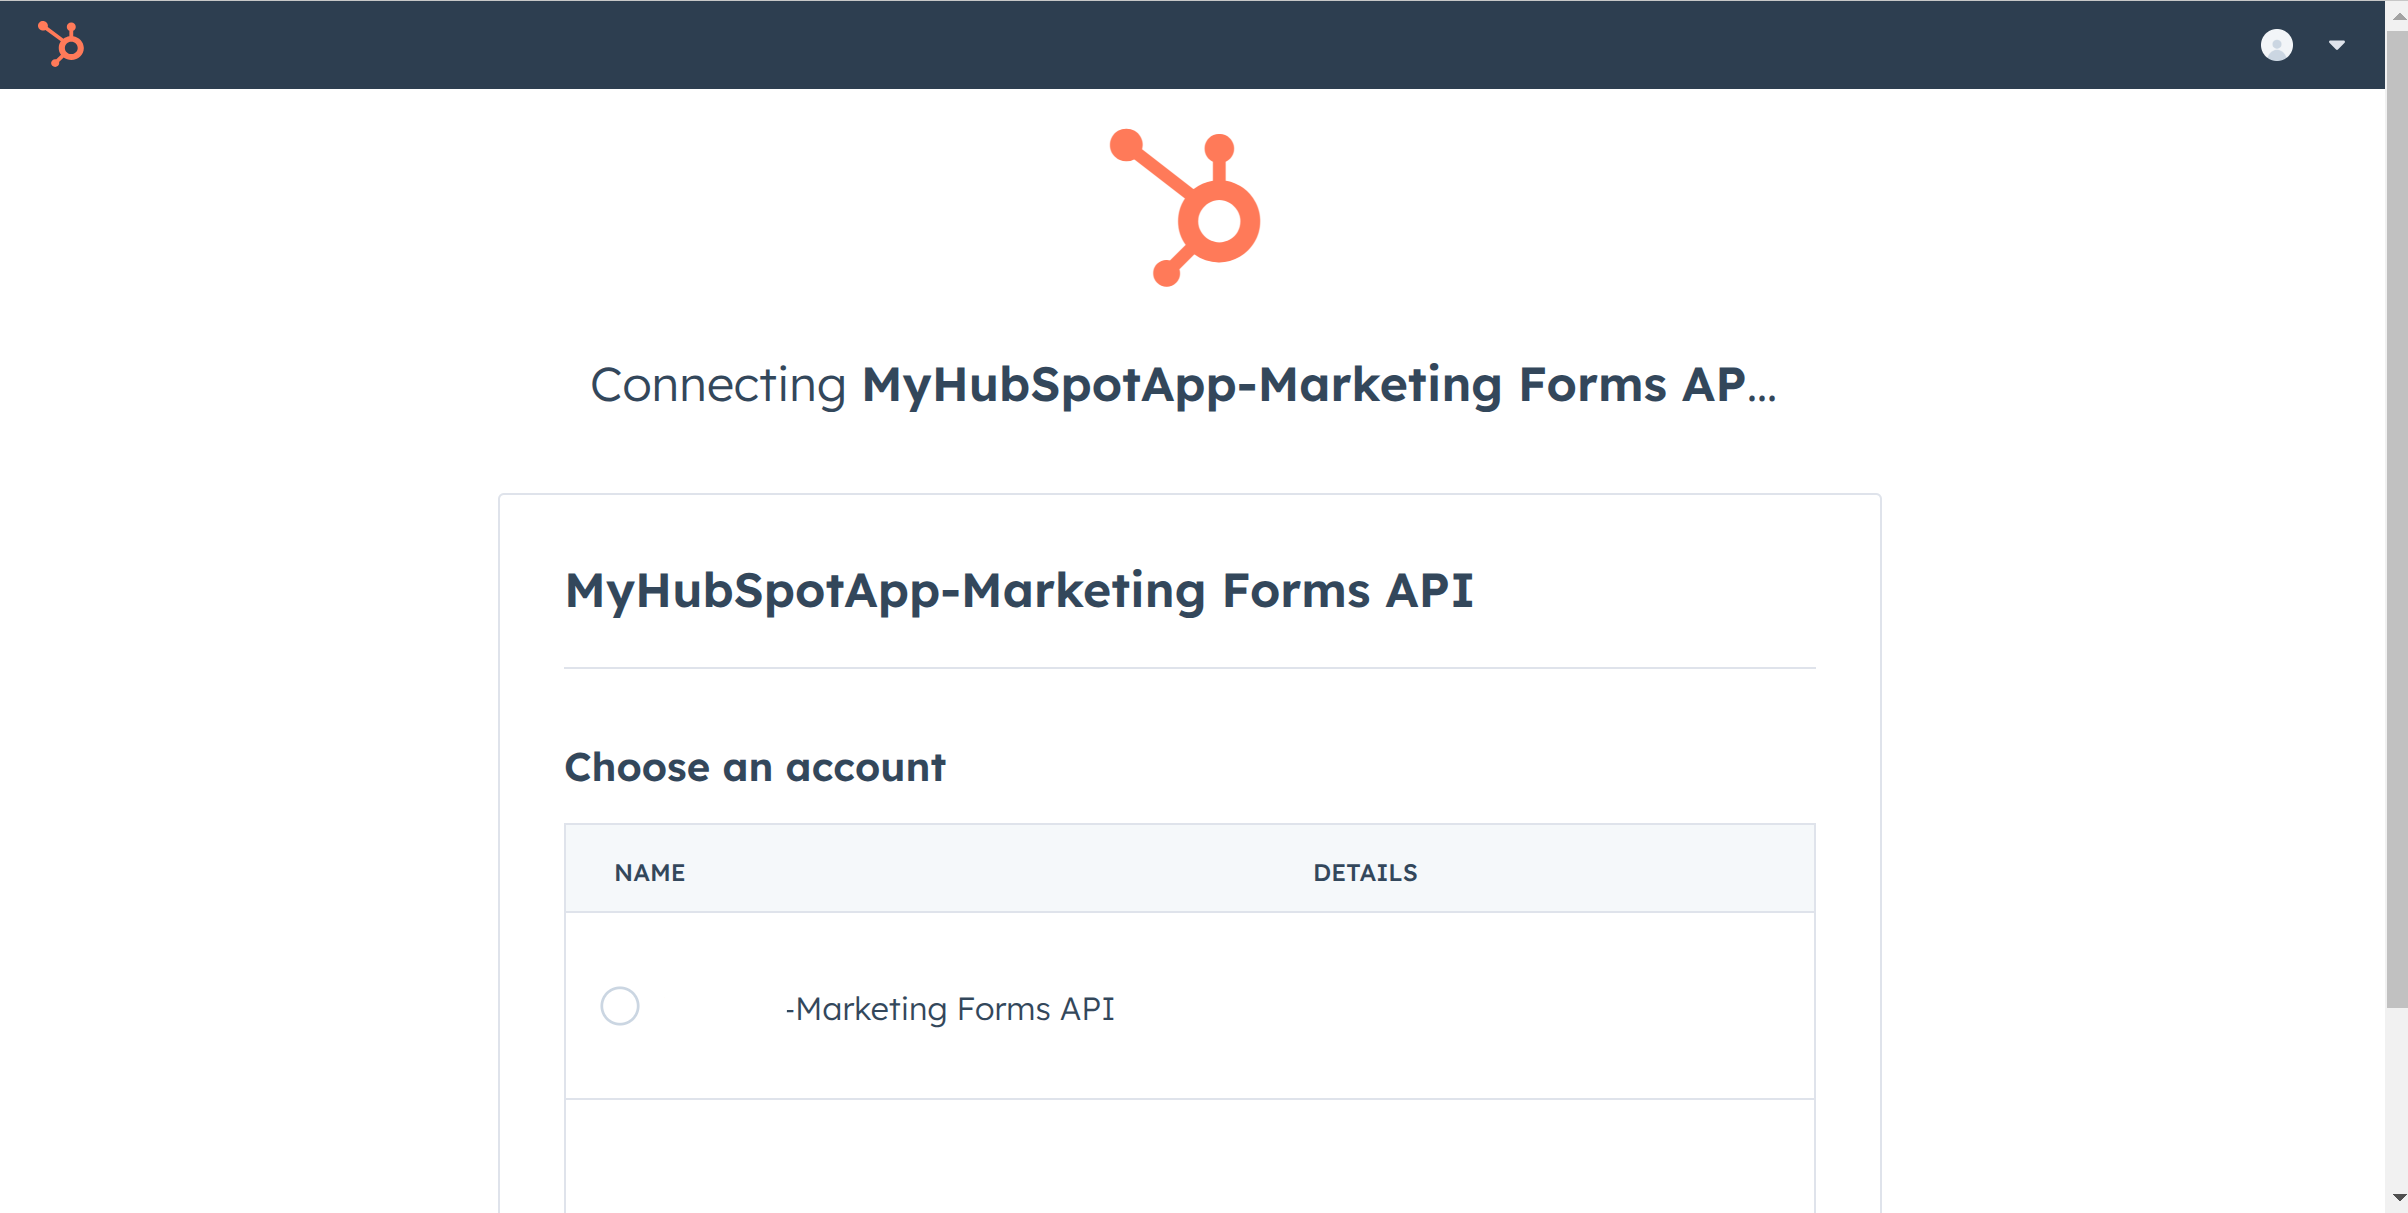
- Paste it in the browser and select your developer test account to intall the app when prompted.
-
A code will be displayed in the browser. Copy the code.
-
Run the following curl command. Replace the
<YOUR_CLIENT_ID>,<YOUR_REDIRECT_URI> and<YOUR_CLIENT_SECRET>with your specific value. Use the code you received in the above step 3 as the<CODE>.-
Linux/macOS
curl --request POST \ --url https://api.hubapi.com/oauth/v1/token \ --header 'content-type: application/x-www-form-urlencoded' \ --data 'grant_type=authorization_code&code=<CODE>&redirect_uri=<YOUR_REDIRECT_URI>&client_id=<YOUR_CLIENT_ID>&client_secret=<YOUR_CLIENT_SECRET>' -
Windows
curl --request POST ^ --url https://api.hubapi.com/oauth/v1/token ^ --header 'content-type: application/x-www-form-urlencoded' ^ --data 'grant_type=authorization_code&code=<CODE>&redirect_uri=<YOUR_REDIRECT_URI>&client_id=<YOUR_CLIENT_ID>&client_secret=<YOUR_CLIENT_SECRET>'
This command will return the access token necessary for API calls.
{ "token_type": "bearer", "refresh_token": "<Refresh Token>", "access_token": "<Access Token>", "expires_in": 1800 } -
-
Store the access token securely for use in your application.
Quickstart
To use the "HubSpot Marketing Forms" connector in your Ballerina application, update the .bal file as follows:
Step 1: Import the module
Import the hubspot.marketing.forms module and oauth2 module.
import ballerinax/hubspot.marketing.forms as hsmforms; import ballerina/oauth2;
Step 2: Instantiate a new connector
-
Create a
Config.tomlfile and, configure the obtained credentials in the above steps as follows:clientId = <Client Id> clientSecret = <Client Secret> refreshToken = <Refresh Token> -
Instantiate a
hsmforms:ConnectionConfigwith the obtained credentials and initialize the connector with it.configurable string clientId = ?; configurable string clientSecret = ?; configurable string refreshToken = ?; final hsmforms:ConnectionConfig hsmformsConfig = { auth : { clientId, clientSecret, refreshToken, credentialBearer: oauth2:POST_BODY_BEARER } }; final hsmforms:Client hsmformsClient = check new (hsmformsConfig);
Step 3: Invoke the connector operation
Now, utilize the available connector operations. A sample usecase is shown below.
Create a Marketing Form
public function main() returns error? { hsforms:FormDefinitionCreateRequestBase inputFormDefinition = { formType: "hubspot", name: "for", createdAt: "2024-12-23T07:13:28.102Z", updatedAt: "2024-12-23T07:13:28.102Z", archived: false, fieldGroups: [ { groupType: "default_group", richTextType: "text", fields: [ { objectTypeId: "0-1", name: "email", label: "Email", required: true, hidden: false, fieldType: "email", validation: { blockedEmailDomains: [], useDefaultBlockList: false } } ] }, { groupType: "default_group", richTextType: "text", fields: [ { objectTypeId: "0-1", name: "firstname", label: "First name", required: true, hidden: false, fieldType: "single_line_text" }, { objectTypeId: "0-1", name: "lastname", label: "Last name", required: true, hidden: false, fieldType: "single_line_text" } ] }, { groupType: "default_group", richTextType: "text", fields: [ { objectTypeId: "0-1", name: "message", label: "Message", required: true, hidden: false, fieldType: "multi_line_text" } ] } ], configuration: { language: "en", createNewContactForNewEmail: true, editable: true, allowLinkToResetKnownValues: true, lifecycleStages: [], postSubmitAction: { 'type: "thank_you", value: "Thank you for subscribing!" }, prePopulateKnownValues: true, cloneable: true, notifyContactOwner: true, recaptchaEnabled: false, archivable: true, notifyRecipients: ["example@example.com"] }, displayOptions: { renderRawHtml: false, cssClass: "hs-form stacked", theme: "default_style", submitButtonText: "Submit", style: { labelTextSize: "13px", legalConsentTextColor: "#33475b", fontFamily: "arial, helvetica, sans-serif", legalConsentTextSize: "14px", backgroundWidth: "100%", helpTextSize: "11px", submitFontColor: "#ffffff", labelTextColor: "#33475b", submitAlignment: "left", submitSize: "12px", helpTextColor: "#7C98B6", submitColor: "#ff7a59" } }, legalConsentOptions: { 'type: "none" } }; hsforms:FormDefinitionBase response = check baseClient->/.post( inputFormDefinition ); }
Examples
The "HubSpot Marketing Forms" connector provides practical examples illustrating usage in various scenarios. Explore these examples, covering the following use cases:
-
Contact Us Form Integration - Build dynamic 'Contact Us' forms to handle customer inquiries efficiently, enabling seamless communication and accurate data collection.
-
Sign Up Form Integration - Create, update, and manage user registration forms with customizable fields such as name, email, and consent checkboxes to streamline user onboarding.
Clients
hubspot.marketing.forms: Client
Constructor
Gets invoked to initialize the connector.
init (ConnectionConfig config, string serviceUrl)- config ConnectionConfig - The configurations to be used when initializing the
connector
- serviceUrl string "https://api.hubapi.com/marketing/v3/forms" - URL of the target service
delete [string formId]
Archive a form definition
Return Type
- json|error - No content
get .
function get .(map<string|string[]> headers, *GetMarketingV3Forms_getpageQueries queries) returns CollectionResponseFormDefinitionBaseForwardPaging|errorGet a list of forms
Parameters
- queries *GetMarketingV3Forms_getpageQueries - Queries to be sent with the request
Return Type
- CollectionResponseFormDefinitionBaseForwardPaging|error - successful operation
get [string formId]
function get [string formId](map<string|string[]> headers, *GetMarketingV3FormsFormid_getbyidQueries queries) returns FormDefinitionBase|errorGet a form definition
Parameters
- queries *GetMarketingV3FormsFormid_getbyidQueries - Queries to be sent with the request
Return Type
- FormDefinitionBase|error - successful operation
patch [string formId]
function patch [string formId](HubSpotFormDefinitionPatchRequest payload, map<string|string[]> headers) returns FormDefinitionBase|errorPartially update a form definition
Parameters
- payload HubSpotFormDefinitionPatchRequest -
Return Type
- FormDefinitionBase|error - successful operation
post .
function post .(FormDefinitionCreateRequestBase payload, map<string|string[]> headers) returns FormDefinitionBase|errorCreate a form
Parameters
- payload FormDefinitionCreateRequestBase -
Return Type
- FormDefinitionBase|error - successful operation
put [string formId]
function put [string formId](HubSpotFormDefinition payload, map<string|string[]> headers) returns FormDefinitionBase|errorUpdate a form definition
Parameters
- payload HubSpotFormDefinition -
Return Type
- FormDefinitionBase|error - successful operation
Records
hubspot.marketing.forms: ApiKeysConfig
Provides API key configurations needed when communicating with a remote HTTP endpoint.
Fields
- private\-app\-legacy string -
hubspot.marketing.forms: ClientHttp1Settings
Provides settings related to HTTP/1.x protocol.
Fields
- keepAlive KeepAlive(default http:KEEPALIVE_AUTO) - Specifies whether to reuse a connection for multiple requests
- chunking Chunking(default http:CHUNKING_AUTO) - The chunking behaviour of the request
- proxy? ProxyConfig - Proxy server related options
hubspot.marketing.forms: CollectionResponseFormDefinitionBaseForwardPaging
Fields
- paging? ForwardPaging -
- results (HubSpotFormDefinition)[] -
hubspot.marketing.forms: ConnectionConfig
Provides a set of configurations for controlling the behaviours when communicating with a remote HTTP endpoint.
Fields
- auth BearerTokenConfig|OAuth2RefreshTokenGrantConfig|ApiKeysConfig - Provides Auth configurations needed when communicating with a remote HTTP endpoint.
- httpVersion HttpVersion(default http:HTTP_2_0) - The HTTP version understood by the client
- http1Settings? ClientHttp1Settings - Configurations related to HTTP/1.x protocol
- http2Settings? ClientHttp2Settings - Configurations related to HTTP/2 protocol
- timeout decimal(default 60) - The maximum time to wait (in seconds) for a response before closing the connection
- forwarded string(default "disable") - The choice of setting
forwarded/x-forwardedheader
- poolConfig? PoolConfiguration - Configurations associated with request pooling
- cache? CacheConfig - HTTP caching related configurations
- compression Compression(default http:COMPRESSION_AUTO) - Specifies the way of handling compression (
accept-encoding) header
- circuitBreaker? CircuitBreakerConfig - Configurations associated with the behaviour of the Circuit Breaker
- retryConfig? RetryConfig - Configurations associated with retrying
- responseLimits? ResponseLimitConfigs - Configurations associated with inbound response size limits
- secureSocket? ClientSecureSocket - SSL/TLS-related options
- proxy? ProxyConfig - Proxy server related options
- validation boolean(default true) - Enables the inbound payload validation functionality which provided by the constraint package. Enabled by default
hubspot.marketing.forms: DatepickerField
A form field used to select a date
Fields
- objectTypeId string - A unique ID for this field's CRM object type. For example a CONTACT field will have the object type ID 0-1.
- defaultValue? string - The value filled in by default. This value will be submitted unless the customer modifies it.
- name string - The identifier of the field. In combination with the object type ID, it must be unique.
- description? string - Additional text helping the customer to complete the field.
- dependentFields? DependentField[] - A list of other fields to make visible based on the value filled in for this field.
- label string - The main label for the form field.
- placeholder? string - The prompt text showing when the field isn't filled in.
- fieldType "datepicker" - Determines how the field will be displayed and validated.
- required boolean - Whether a value for this field is required when submitting the form.
hubspot.marketing.forms: DependentField
A form field that will be displayed based on what the customer entered in another field.
Fields
- dependentCondition DependentFieldFilter -
hubspot.marketing.forms: DependentFieldFilter
A condition based on customer input
Fields
- rangeStart string -
- values string[] -
- value string -
- operator "eq"|"neq"|"contains"|"doesnt_contain"|"str_starts_with"|"str_ends_with"|"lt"|"lte"|"gt"|"gte"|"between"|"not_between"|"within_time_reverse"|"within_time"|"set_any"|"set_not_any"|"set_all"|"set_not_all"|"set_eq"|"set_neq"|"is_not_empty" -
- rangeEnd string -
hubspot.marketing.forms: DropdownField
A field consisting of a drop down with multiple choices.
Fields
- objectTypeId string - A unique ID for this field's CRM object type. For example a CONTACT field will have the object type ID 0-1.
- name string - The identifier of the field. In combination with the object type ID, it must be unique.
- options EnumeratedFieldOption[] - The list of available choices for this field.
- description? string - Additional text helping the customer to complete the field.
- defaultValues string[] - The values selected by default. Those values will be submitted unless the customer modifies them.
- dependentFields? DependentField[] - A list of other fields to make visible based on the value filled in for this field.
- label string - The main label for the form field.
- placeholder? string - The prompt text showing when the field isn't filled in.
- fieldType "dropdown" - Determines how the field will be displayed and validated.
- required boolean - Whether a value for this field is required when submitting the form.
hubspot.marketing.forms: EmailField
A form field used for collecting an email address.
Fields
- objectTypeId string - A unique ID for this field's CRM object type. For example a CONTACT field will have the object type ID 0-1.
- defaultValue? string - The value filled in by default. This value will be submitted unless the customer modifies it.
- name string - The identifier of the field. In combination with the object type ID, it must be unique.
- description? string - Additional text helping the customer to complete the field.
- dependentFields? DependentField[] - A list of other fields to make visible based on the value filled in for this field.
- label string - The main label for the form field.
- placeholder? string - The prompt text showing when the field isn't filled in.
- fieldType "email" - Determines how the field will be displayed and validated.
- required boolean - Whether a value for this field is required when submitting the form.
- validation EmailFieldValidation -
hubspot.marketing.forms: EmailFieldValidation
Describes how an email address should be validated.
Fields
- useDefaultBlockList boolean - Whether to block the free email providers.
- blockedEmailDomains string[] - A list of email domains to block.
hubspot.marketing.forms: EnumeratedFieldOption
Fields
- displayOrder Signed32 - The order the choices will be displayed in.
- description? string -
- label string - The visible label for this choice.
- value string - The value which will be submitted if this choice is selected.
hubspot.marketing.forms: FieldGroup
A collection of up to three form fields usually displayed in a row.
Fields
- groupType "default_group"|"progressive"|"queued" -
- richTextType "text"|"image" - The type of rich text included. The default value is text.
- richText? string - A block of rich text or an image. Those can be used to add extra information for the customers filling in the form. If the field group includes fields, the rich text will be displayed before the fields.
- fields (EmailField|PhoneField|MobilePhoneField|SingleLineTextField|MultiLineTextField|NumberField|SingleCheckboxField|MultipleCheckboxesField|DropdownField|RadioField|DatepickerField|FileField|PaymentLinkRadioField)[] - The form fields included in the group
hubspot.marketing.forms: FileField
A form field used for uploading one or more files.
Fields
- objectTypeId string - A unique ID for this field's CRM object type. For example a CONTACT field will have the object type ID 0-1.
- allowMultipleFiles boolean - Whether to allow the upload of multiple files.
- defaultValue? string - The value filled in by default. This value will be submitted unless the customer modifies it.
- name string - The identifier of the field. In combination with the object type ID, it must be unique.
- description? string - Additional text helping the customer to complete the field.
- dependentFields? DependentField[] - A list of other fields to make visible based on the value filled in for this field.
- label string - The main label for the form field.
- placeholder? string - The prompt text showing when the field isn't filled in.
- fieldType "file" - Determines how the field will be displayed and validated.
- required boolean - Whether a value for this field is required when submitting the form.
hubspot.marketing.forms: FormDisplayOptions
Options for styling the form.
Fields
- renderRawHtml boolean - Whether the form will render as raw HTML as opposed to inside an iFrame.
- cssClass? string -
- theme "default_style"|"canvas"|"linear"|"round"|"sharp"|"legacy" - The theme used for styling the input fields. This will not apply if the form is added to a HubSpot CMS page.
- submitButtonText string - The text displayed on the form submit button.
- style FormStyle -
hubspot.marketing.forms: FormPostSubmitAction
What should happen after the customer submits the form.
Fields
- 'type "thank_you"|"redirect_url" - The action to take after submit. The default action is displaying a thank you message.
- value string - The thank you text or the page to redirect to.
hubspot.marketing.forms: FormStyle
Styling options for the form
Fields
- labelTextSize string -
- legalConsentTextColor string -
- fontFamily string -
- legalConsentTextSize string -
- backgroundWidth string -
- helpTextSize string -
- submitFontColor string -
- labelTextColor string -
- submitAlignment "left"|"right"|"center" -
- submitSize string -
- helpTextColor string -
- submitColor string -
hubspot.marketing.forms: ForwardPaging
Fields
- next? NextPage -
hubspot.marketing.forms: GetMarketingV3Forms_getpageQueries
Represents the Queries record for the operation: get-/marketing/v3/forms/_getPage
Fields
- formTypes? ("hubspot"|"captured"|"flow"|"blog_comment"|"all")[] - The form types to be included in the results.
- archived? boolean - Whether to return only results that have been archived.
- 'limit? Signed32 - The maximum number of results to display per page.
- after? string - The paging cursor token of the last successfully read resource will be returned as the
paging.next.afterJSON property of a paged response containing more results.
hubspot.marketing.forms: GetMarketingV3FormsFormid_getbyidQueries
Represents the Queries record for the operation: get-/marketing/v3/forms/{formId}_getById
Fields
- archived? boolean - Whether to return only results that have been archived.
hubspot.marketing.forms: HubSpotFormConfiguration
Fields
- createNewContactForNewEmail boolean - Whether to create a new contact when a form is submitted with an email address that doesn’t match any in your existing contacts records.
- editable boolean - Whether the form can be edited.
- allowLinkToResetKnownValues boolean - Whether to add a reset link to the form. This removes any pre-populated content on the form and creates a new contact on submission.
- lifecycleStages? LifecycleStage[] -
- postSubmitAction FormPostSubmitAction -
- language "af"|"ar-eg"|"bg"|"bn"|"ca-es"|"cs"|"da"|"de"|"el"|"en"|"es"|"es-mx"|"fi"|"fr"|"fr-ca"|"he-il"|"hr"|"hu"|"id"|"it"|"ja"|"ko"|"lt"|"ms"|"nl"|"no-no"|"pl"|"pt"|"pt-br"|"ro"|"ru"|"sk"|"sl"|"sv"|"th"|"tl"|"tr"|"uk"|"vi"|"zh-cn"|"zh-hk"|"zh-tw" - The language of the form.
- prePopulateKnownValues boolean - Whether contact fields should pre-populate with known information when a contact returns to your site.
- cloneable boolean - Whether the form can be cloned.
- notifyContactOwner boolean - Whether to send a notification email to the contact owner when a submission is received.
- recaptchaEnabled boolean - Whether CAPTCHA (spam prevention) is enabled.
- archivable boolean - Whether the form can be archived.
- notifyRecipients string[] - The list of user IDs to receive a notification email when a submission is received.
hubspot.marketing.forms: HubSpotFormDefinition
Fields
- formType "hubspot" -
- id string -
- name string -
- createdAt string -
- updatedAt string -
- archived boolean -
- archivedAt? string -
- fieldGroups FieldGroup[] -
- configuration HubSpotFormConfiguration -
- displayOptions FormDisplayOptions -
hubspot.marketing.forms: HubSpotFormDefinitionCreateRequest
Fields
- formType "hubspot" -
- name string -
- createdAt string -
- updatedAt string -
- archived boolean -
- archivedAt? string -
- fieldGroups FieldGroup[] -
- configuration HubSpotFormConfiguration -
- displayOptions FormDisplayOptions -
hubspot.marketing.forms: HubSpotFormDefinitionPatchRequest
Fields
- fieldGroups? FieldGroup[] - The fields in the form, grouped in rows.
- archived? boolean - Whether this form is archived.
- configuration? HubSpotFormConfiguration -
- name? string - The name of the form. Expected to be unique for a hub.
- displayOptions? FormDisplayOptions -
hubspot.marketing.forms: LegalConsentCheckbox
Fields
- subscriptionTypeId Signed32 -
- label string - The main label for the form field.
- required boolean - Whether this checkbox is required when submitting the form.
hubspot.marketing.forms: LegalConsentOptionsExplicitConsentToProcess
Fields
- communicationsCheckboxes LegalConsentCheckbox[] -
- communicationConsentText? string -
- consentToProcessCheckboxLabel? string -
- 'type "explicit_consent_to_process" -
- privacyText string -
- consentToProcessText? string -
hubspot.marketing.forms: LegalConsentOptionsImplicitConsentToProcess
Fields
- communicationsCheckboxes LegalConsentCheckbox[] -
- communicationConsentText? string -
- 'type "implicit_consent_to_process" -
- privacyText string -
- consentToProcessText? string -
hubspot.marketing.forms: LegalConsentOptionsLegitimateInterest
Fields
- subscriptionTypeIds int[] -
- lawfulBasis "lead"|"client"|"other" -
- 'type "legitimate_interest" -
- privacyText string -
hubspot.marketing.forms: LegalConsentOptionsNone
Fields
- 'type "none" -
hubspot.marketing.forms: LifecycleStage
Fields
- objectTypeId string - The objectTypeId for both contact and company
- value string - The internal name of the contact's lifecycle stage set when submitting a form
hubspot.marketing.forms: MobilePhoneField
A form field used for collecting a mobile phone number.
Fields
- objectTypeId string - A unique ID for this field's CRM object type. For example a CONTACT field will have the object type ID 0-1.
- defaultValue? string - The value filled in by default. This value will be submitted unless the customer modifies it.
- name string - The identifier of the field. In combination with the object type ID, it must be unique.
- description? string - Additional text helping the customer to complete the field.
- dependentFields? DependentField[] - A list of other fields to make visible based on the value filled in for this field.
- label string - The main label for the form field.
- placeholder? string - The prompt text showing when the field isn't filled in.
- fieldType "mobile_phone" - Determines how the field will be displayed and validated.
- required boolean - Whether a value for this field is required when submitting the form.
- validation PhoneFieldValidation -
hubspot.marketing.forms: MultiLineTextField
A form field consisting of a multiple-line text box.
Fields
- objectTypeId string - A unique ID for this field's CRM object type. For example a CONTACT field will have the object type ID 0-1.
- defaultValue? string - The value filled in by default. This value will be submitted unless the customer modifies it.
- name string - The identifier of the field. In combination with the object type ID, it must be unique.
- description? string - Additional text helping the customer to complete the field.
- dependentFields? DependentField[] - A list of other fields to make visible based on the value filled in for this field.
- label string - The main label for the form field.
- placeholder? string - The prompt text showing when the field isn't filled in.
- fieldType "multi_line_text" - Determines how the field will be displayed and validated.
- required boolean - Whether a value for this field is required when submitting the form.
hubspot.marketing.forms: MultipleCheckboxesField
A form field consisting of a set of checkboxes allowing multiple choices to be selected at one time.
Fields
- objectTypeId string - A unique ID for this field's CRM object type. For example a CONTACT field will have the object type ID 0-1.
- name string - The identifier of the field. In combination with the object type ID, it must be unique.
- options EnumeratedFieldOption[] - The list of available choices for this field.
- description? string - Additional text helping the customer to complete the field.
- defaultValues string[] - The values selected by default. Those values will be submitted unless the customer modifies them.
- dependentFields? DependentField[] - A list of other fields to make visible based on the value filled in for this field.
- label string - The main label for the form field.
- fieldType "multiple_checkboxes" - Determines how the field will be displayed and validated.
- required boolean - Whether a value for this field is required when submitting the form.
hubspot.marketing.forms: NextPage
Fields
- link? string -
- after string -
hubspot.marketing.forms: NumberField
A form field used for collecting a numeric value.
Fields
- objectTypeId string - A unique ID for this field's CRM object type. For example a CONTACT field will have the object type ID 0-1.
- defaultValue? string - The value filled in by default. This value will be submitted unless the customer modifies it.
- name string - The identifier of the field. In combination with the object type ID, it must be unique.
- description? string - Additional text helping the customer to complete the field.
- dependentFields? DependentField[] - A list of other fields to make visible based on the value filled in for this field.
- label string - The main label for the form field.
- placeholder? string - The prompt text showing when the field isn't filled in.
- fieldType "number" - Determines how the field will be displayed and validated.
- required boolean - Whether a value for this field is required when submitting the form.
- validation? NumberFieldValidation -
hubspot.marketing.forms: NumberFieldValidation
Describes how a numeric value should be validated.
Fields
- minAllowedDigits Signed32 -
- maxAllowedDigits Signed32 -
hubspot.marketing.forms: OAuth2RefreshTokenGrantConfig
OAuth2 Refresh Token Grant Configs
Fields
- Fields Included from *OAuth2RefreshTokenGrantConfig
- refreshUrl string(default "https://api.hubapi.com/oauth/v1/token") - Refresh URL
hubspot.marketing.forms: PaymentLinkRadioField
Fields
- objectTypeId string -
- name string -
- options EnumeratedFieldOption[] -
- description? string -
- defaultValues string[] -
- dependentFields? DependentField[] -
- label string -
- fieldType "payment_link_radio" -
- required boolean -
hubspot.marketing.forms: PhoneField
A form field used for collecting a phone number.
Fields
- objectTypeId string - A unique ID for this field's CRM object type. For example a CONTACT field will have the object type ID 0-1.
- defaultValue? string - The value filled in by default. This value will be submitted unless the customer modifies it.
- useCountryCodeSelect boolean - Whether to display a country code drop down next to the phone field.
- name string - The identifier of the field. In combination with the object type ID, it must be unique.
- description? string - Additional text helping the customer to complete the field.
- dependentFields? DependentField[] - A list of other fields to make visible based on the value filled in for this field.
- label string - The main label for the form field.
- placeholder? string - The prompt text showing when the field isn't filled in.
- fieldType "phone" - Determines how the field will be displayed and validated.
- required boolean - Whether a value for this field is required when submitting the form.
- validation PhoneFieldValidation -
hubspot.marketing.forms: PhoneFieldValidation
Describes how a phone number should be validated.
Fields
- minAllowedDigits Signed32 -
- maxAllowedDigits Signed32 -
hubspot.marketing.forms: ProxyConfig
Proxy server configurations to be used with the HTTP client endpoint.
Fields
- host string(default "") - Host name of the proxy server
- port int(default 0) - Proxy server port
- userName string(default "") - Proxy server username
- password string(default "") - Proxy server password
hubspot.marketing.forms: RadioField
A form field consisting of a set of radio options, out of which one can be selected at a time.
Fields
- objectTypeId string - A unique ID for this field's CRM object type. For example a CONTACT field will have the object type ID 0-1.
- name string - The identifier of the field. In combination with the object type ID, it must be unique.
- options EnumeratedFieldOption[] - The list of available choices for this field.
- description? string - Additional text helping the customer to complete the field.
- defaultValues string[] - The values selected by default. Those values will be submitted unless the customer modifies them.
- dependentFields? DependentField[] - A list of other fields to make visible based on the value filled in for this field.
- label string - The main label for the form field.
- placeholder? string - The prompt text showing when the field isn't filled in.
- fieldType "radio" - Determines how the field will be displayed and validated.
- required boolean - Whether a value for this field is required when submitting the form.
hubspot.marketing.forms: SingleCheckboxField
A form field consisting of a single checkbox.
Fields
- objectTypeId string - A unique ID for this field's CRM object type. For example a CONTACT field will have the object type ID 0-1.
- defaultValue? string - The value filled in by default. This value will be submitted unless the customer modifies it.
- name string - The identifier of the field. In combination with the object type ID, it must be unique.
- description? string - Additional text helping the customer to complete the field.
- dependentFields? DependentField[] - A list of other fields to make visible based on the value filled in for this field.
- label string - The main label for the form field.
- fieldType "single_checkbox" - Determines how the field will be displayed and validated.
- required boolean - Whether a value for this field is required when submitting the form.
hubspot.marketing.forms: SingleLineTextField
A form field consisting of a single-line text box.
Fields
- objectTypeId string - A unique ID for this field's CRM object type. For example a CONTACT field will have the object type ID 0-1.
- defaultValue? string - The value filled in by default. This value will be submitted unless the customer modifies it.
- name string - The identifier of the field. In combination with the object type ID, it must be unique.
- description? string - Additional text helping the customer to complete the field.
- dependentFields? DependentField[] - A list of other fields to make visible based on the value filled in for this field.
- label string - The main label for the form field.
- placeholder? string - The prompt text showing when the field isn't filled in.
- fieldType "single_line_text" - Determines how the field will be displayed and validated.
- required boolean - Whether a value for this field is required when submitting the form.
Simple name reference types
hubspot.marketing.forms: FormDefinitionBase
FormDefinitionBase
hubspot.marketing.forms: FormDefinitionCreateRequestBase
FormDefinitionCreateRequestBase