Module hubspot.crm.obj.tickets

ballerinax/hubspot.crm.obj.tickets Ballerina library
Overview
HubSpot is an AI-powered customer relationship management (CRM) platform.
The ballerinax/hubspot.crm.obj.tickets offers APIs to connect and interact with the HubSpot Tickets API endpoints, specifically based on the HubSpot REST API.
Setup guide
To use the HubSpot CRM Object Tickets connector, you must have access to the HubSpot API through a HubSpot developer account and an app under it. If you do not have a HubSpot developer account, you can sign up for one here.
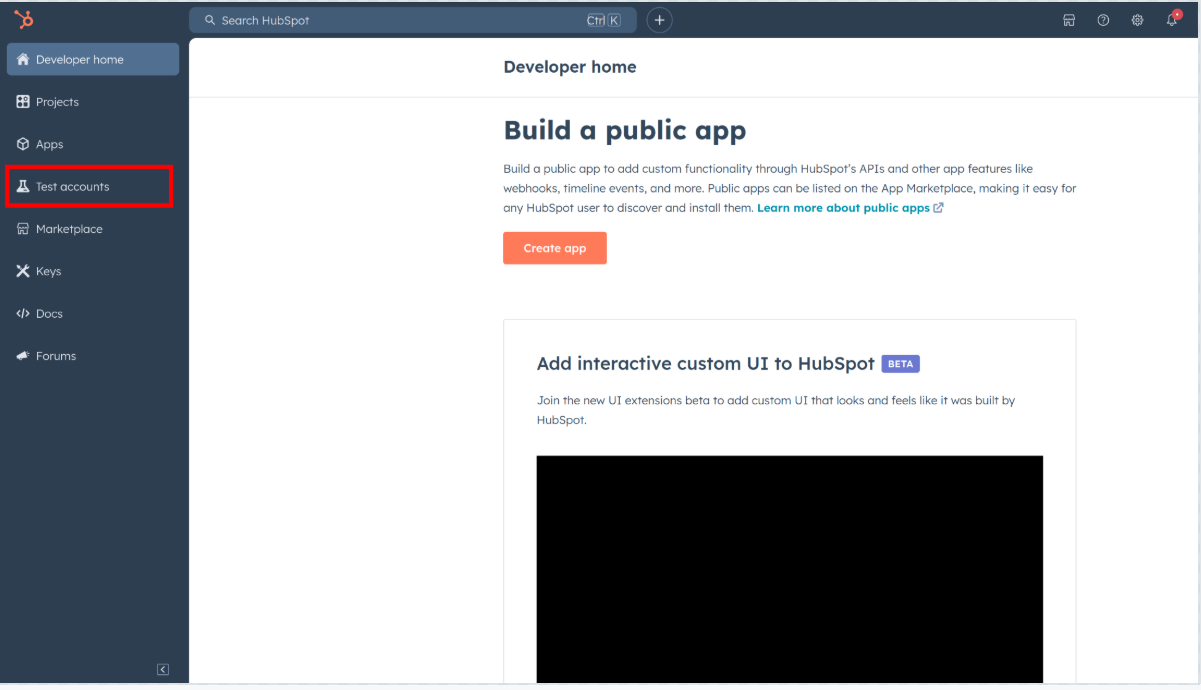
Step 1: Create a HubSpot Developer Account
App Developer Accounts, allow you to create developer test accounts to test apps.
Note: These accounts are only for development and testing purposes. Not to be used in production.
-
Go to "Test Account section" from the left sidebar.
-
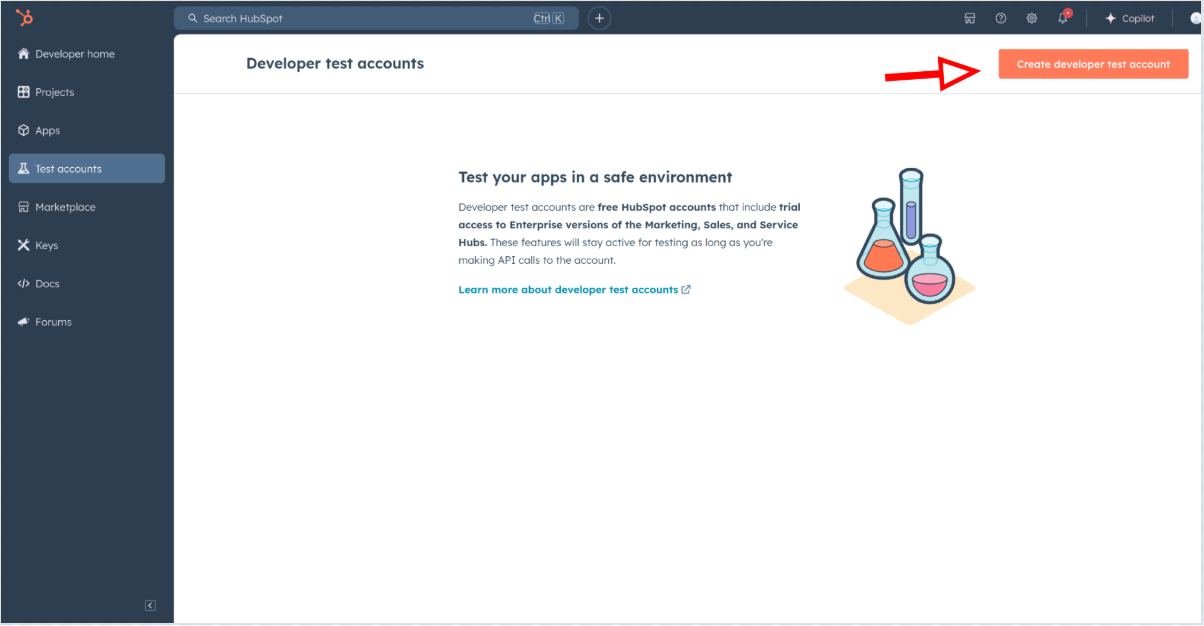
Click "Create developer test account".
-
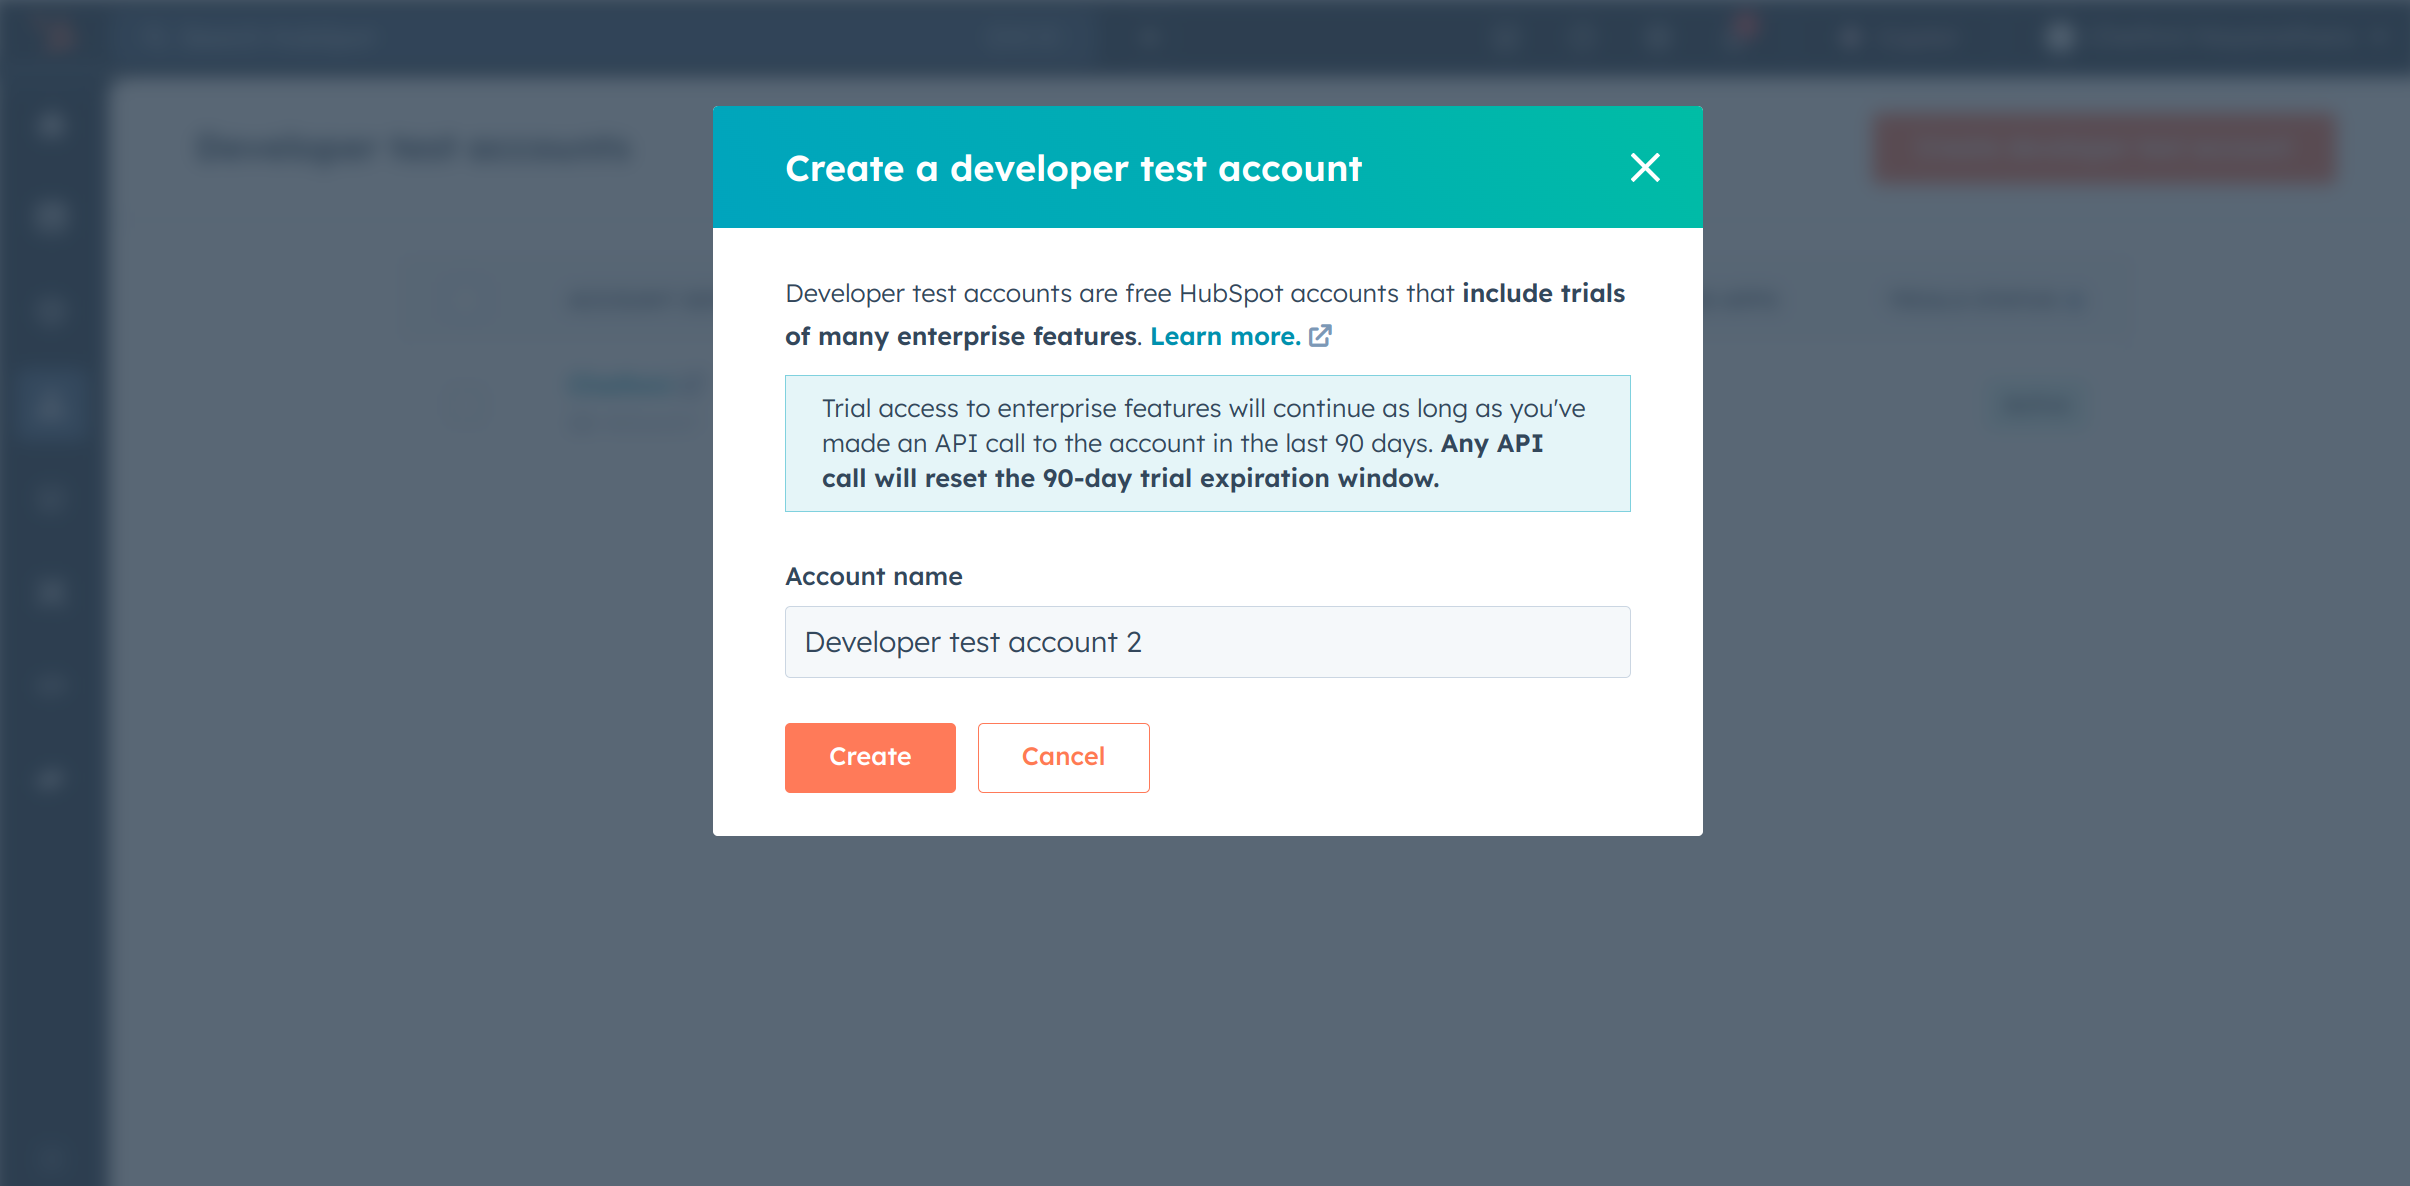
In the next dialogue box, give a name to your test account and click "Create".
Step 2: Create a HubSpot App under your account
-
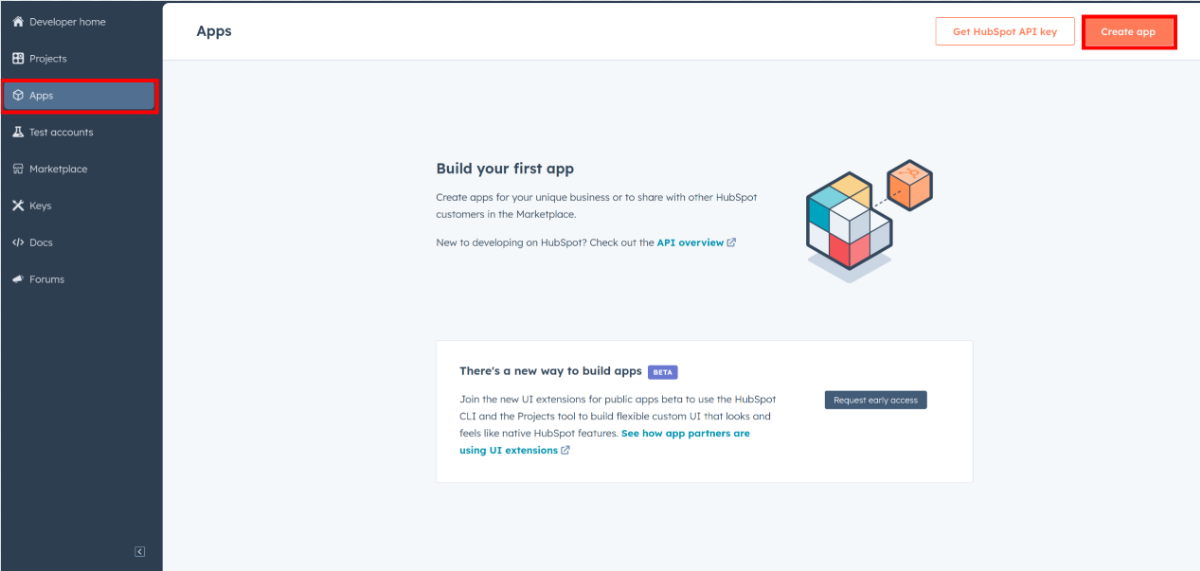
In your developer account, navigate to the "Apps" section. Click on "Create App".
-
Provide the necessary details, including the app name and description.
Step 3: Configure the Authentication Flow
-
Move to the Auth Tab.
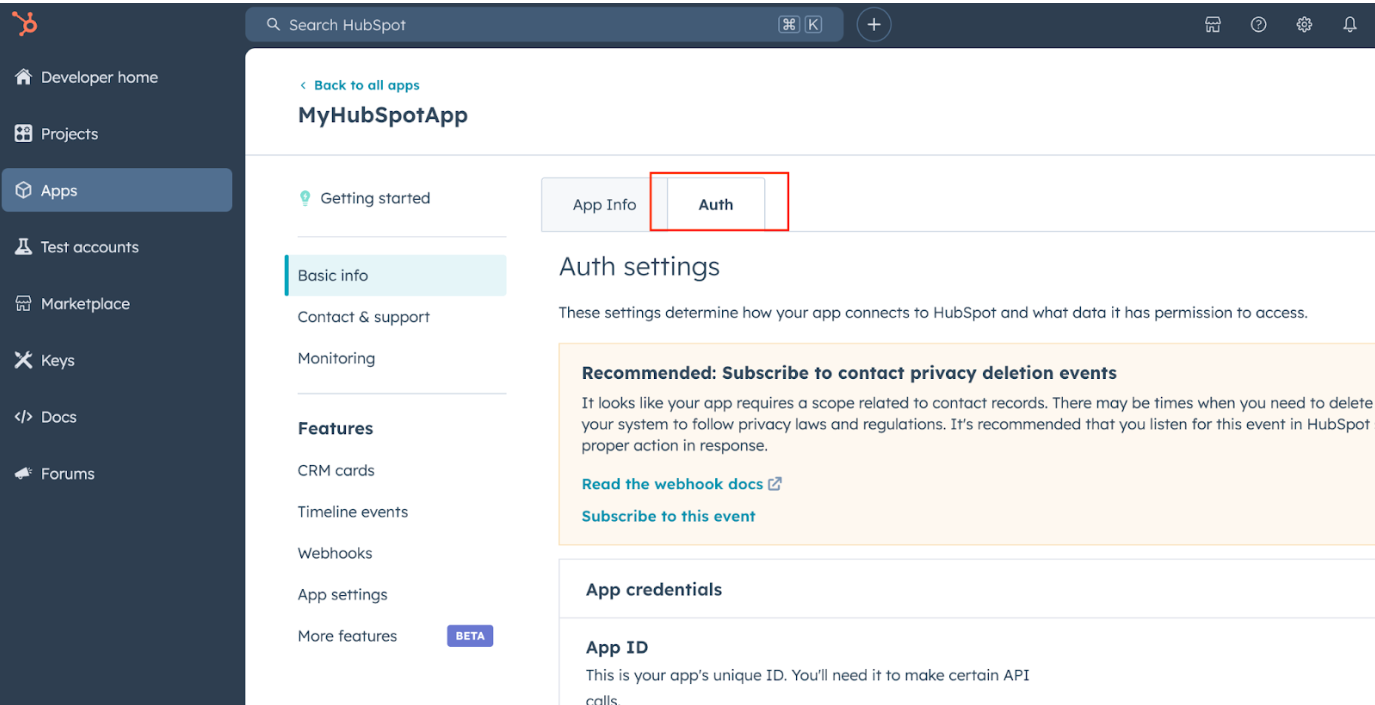
-
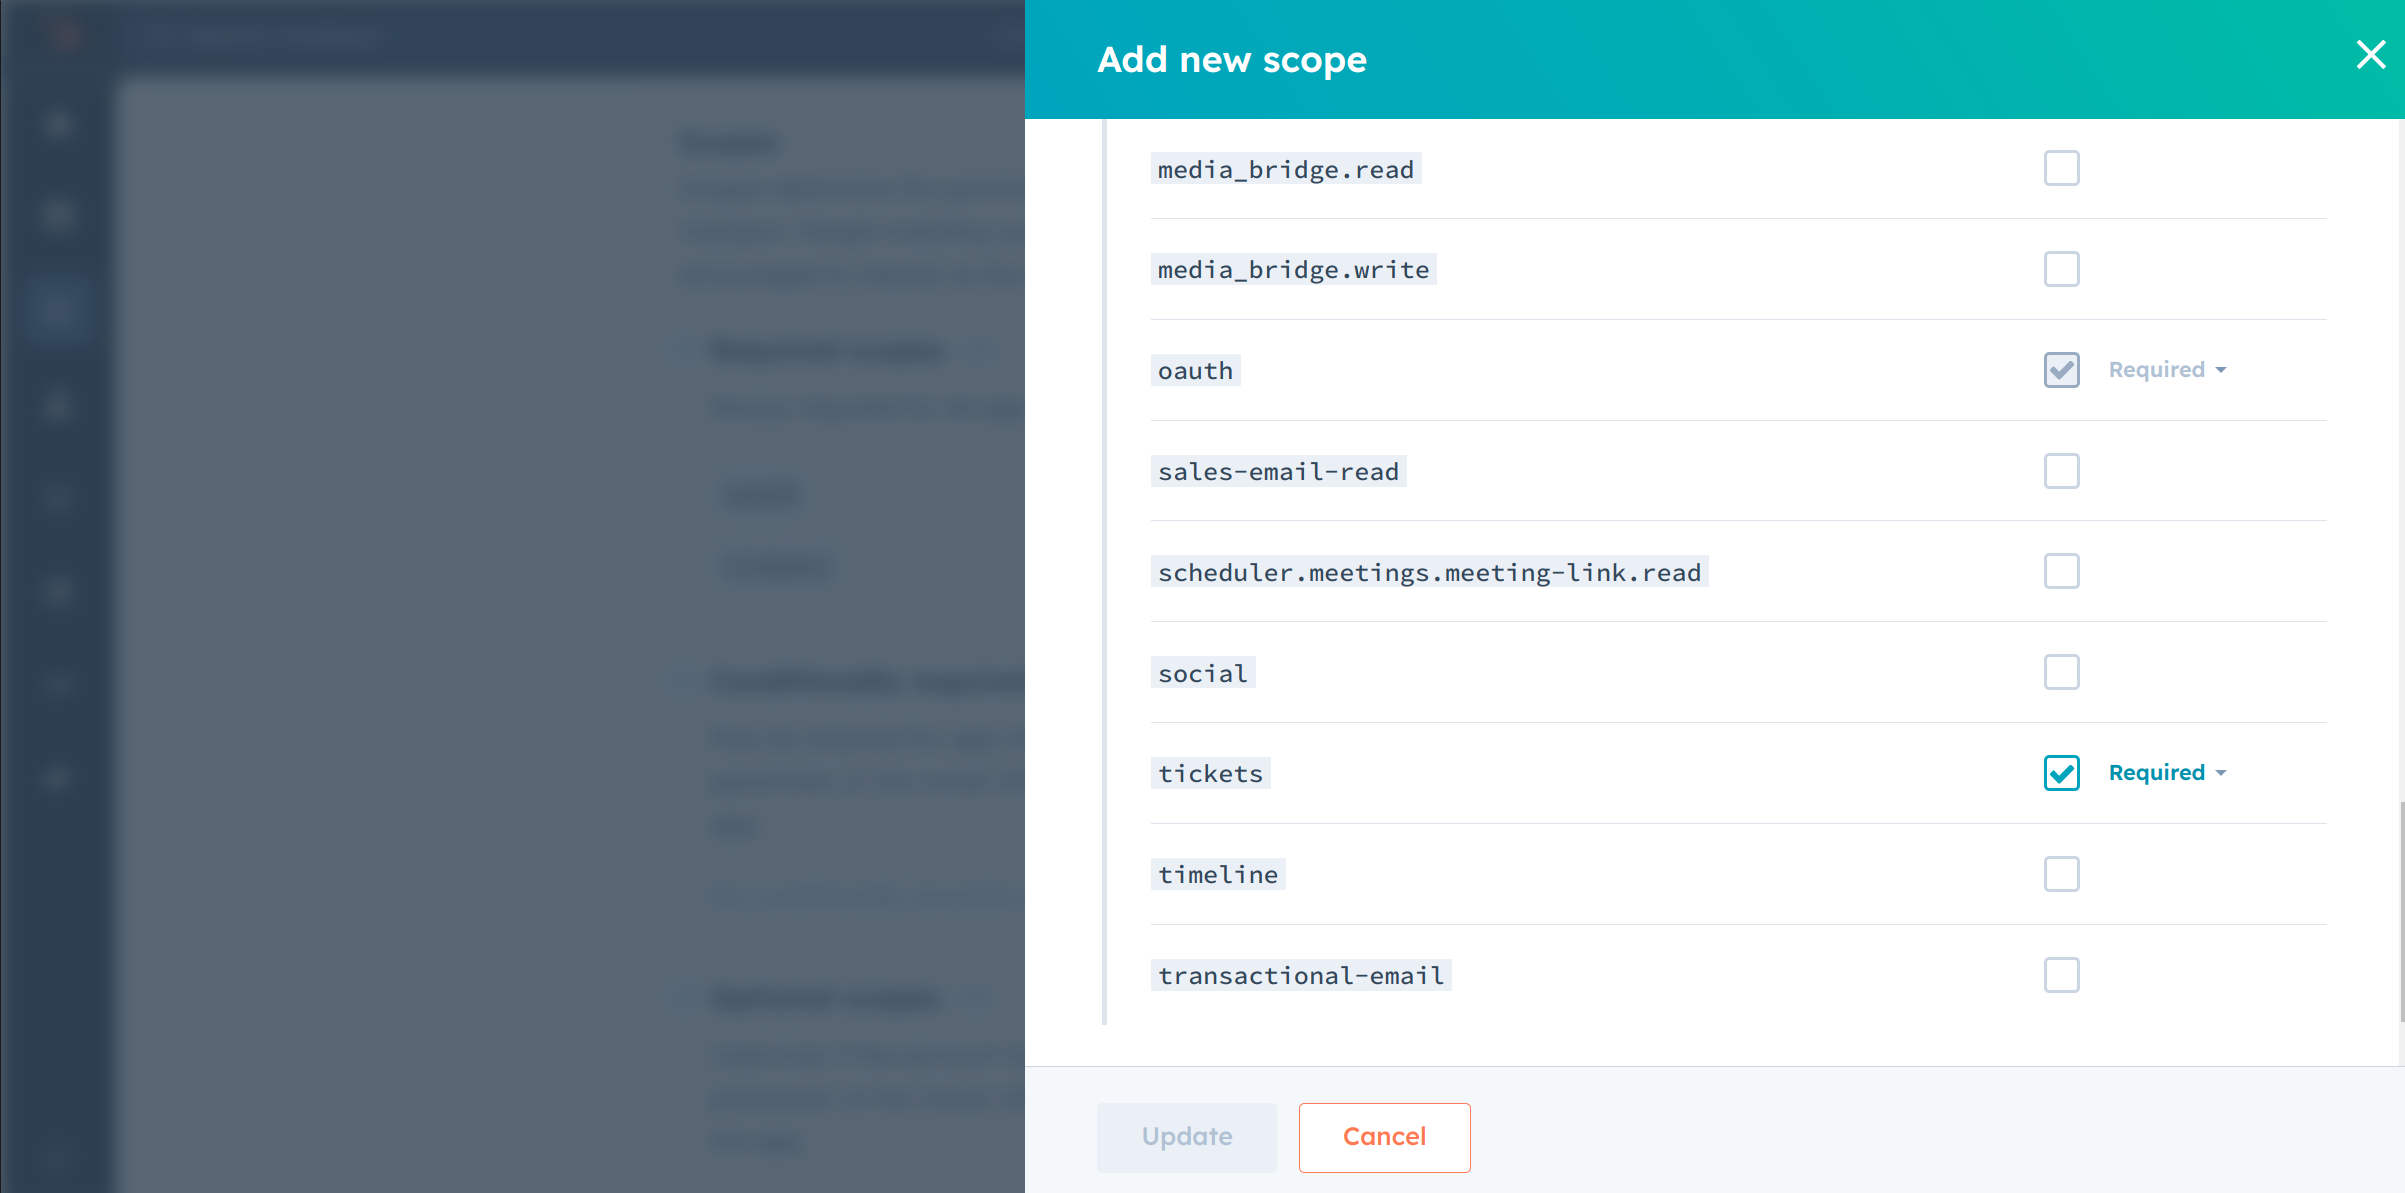
In the "Scopes" section, add the following scopes for your app using the "Add new scope" button.
ticketsoauth
-
Add your Redirect URI in the relevant section. You can use
localhostaddresses for local development purposes. Then Click "Create App".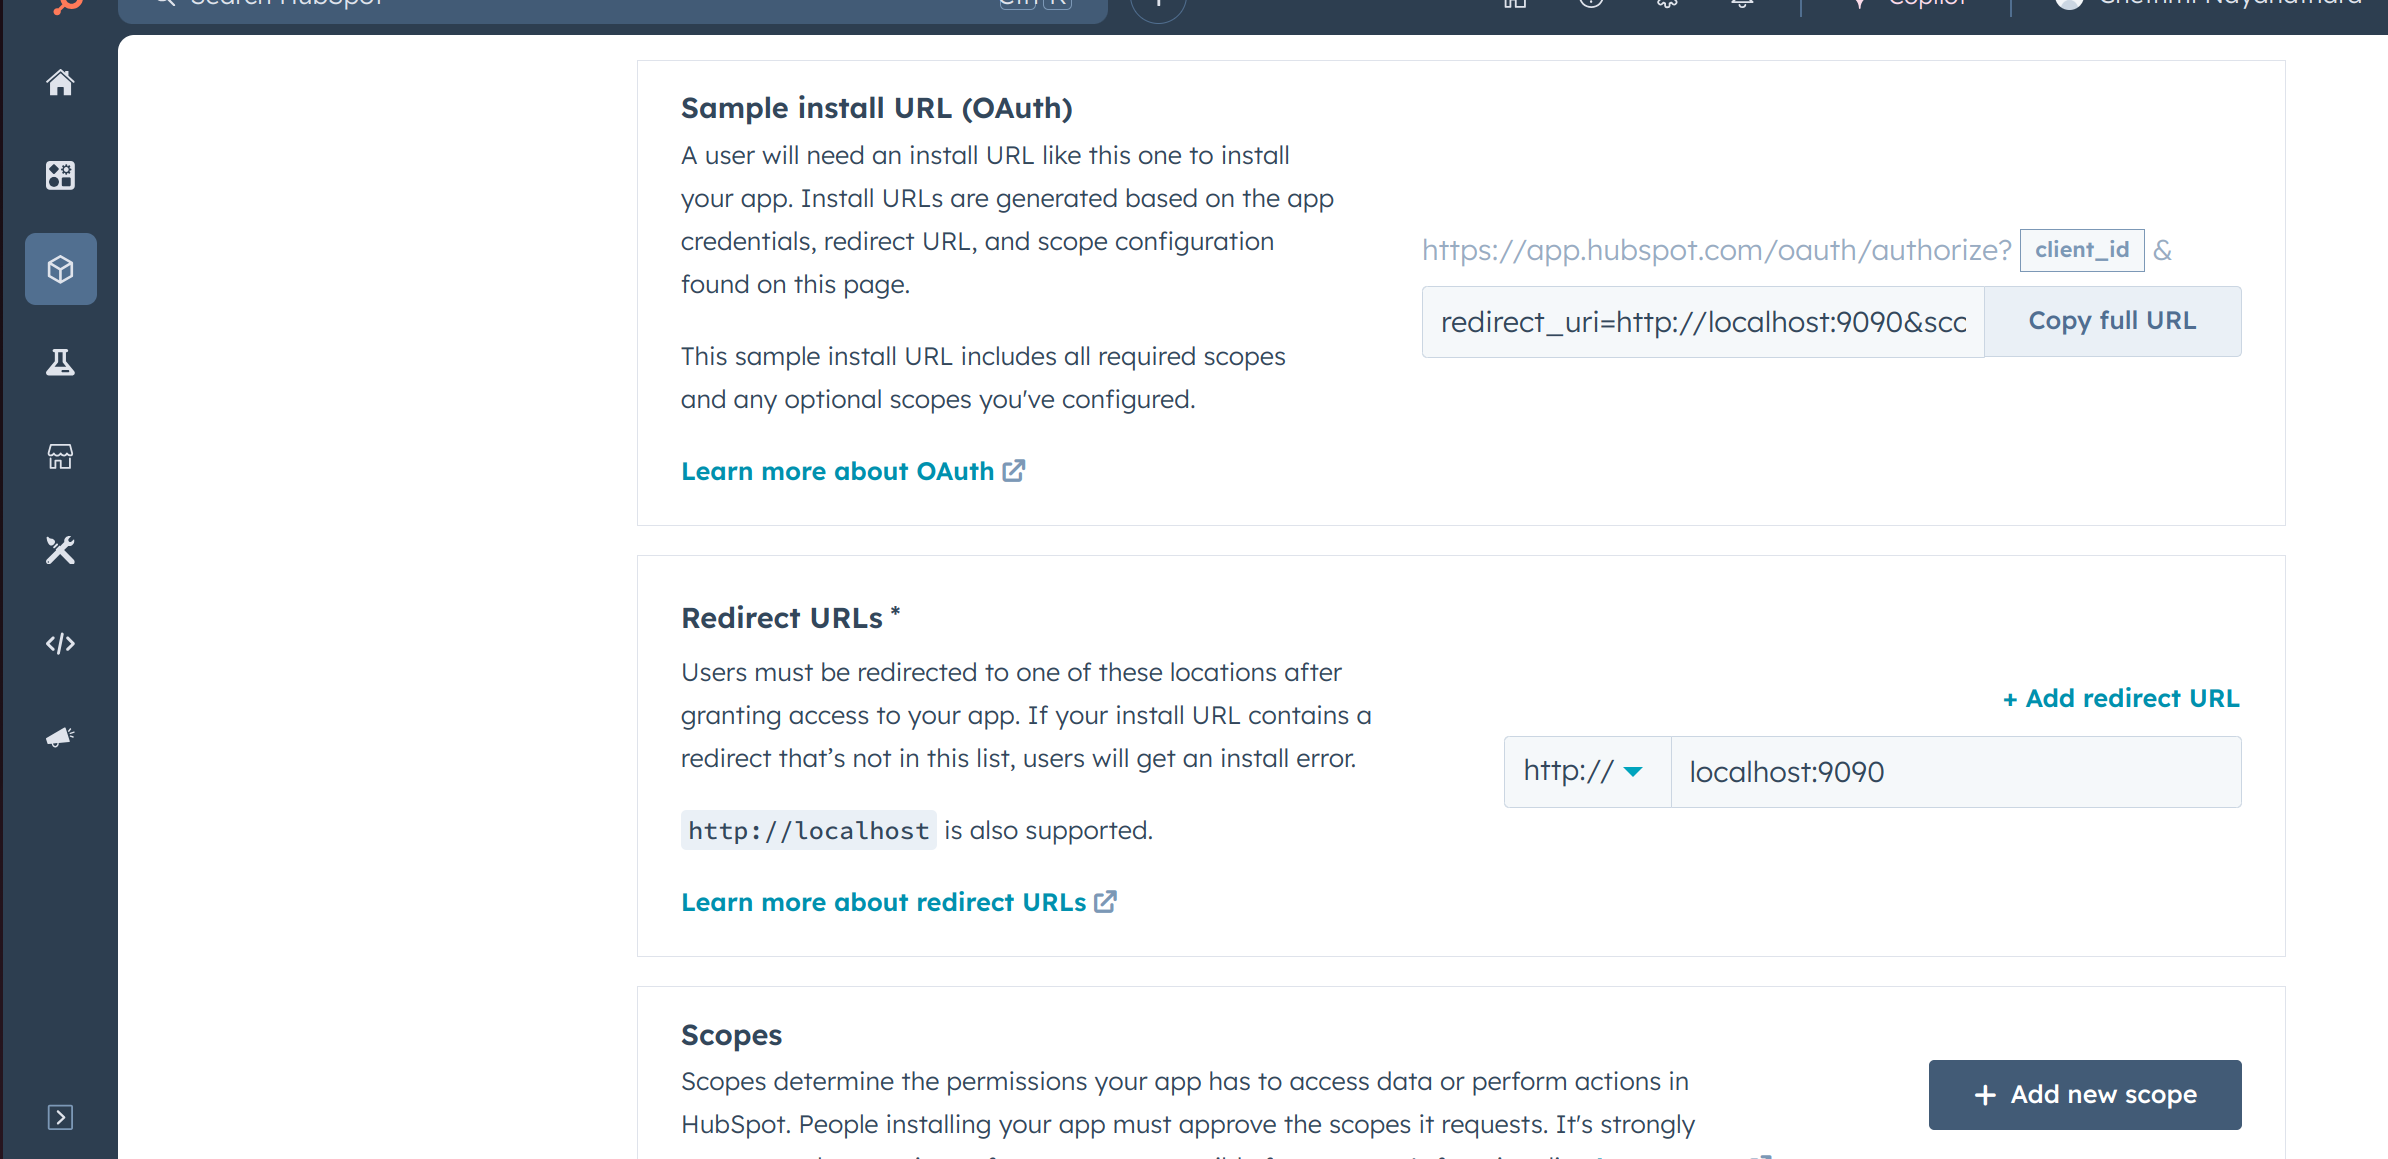
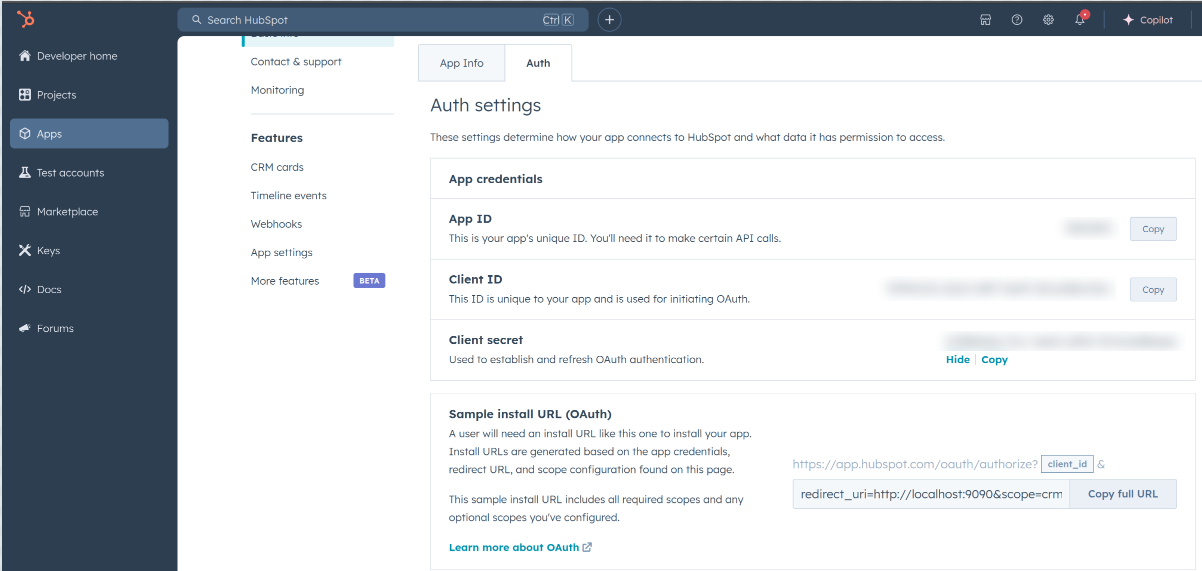
Step 4: Get your Client ID and Client Secret
-
Navigate to the "Auth" tab. Make sure to save the provided Client ID and Client Secret.
Step 5: Setup Authentication Flow
Before proceeding with the Quickstart, ensure you have obtained the Access Token using the following steps:
-
Create an authorization URL using the following format:
https://app.hubspot.com/oauth/authorize?client_id=<YOUR_CLIENT_ID>&scope=<YOUR_SCOPES>&redirect_uri=<YOUR_REDIRECT_URI>Replace the
<YOUR_CLIENT_ID>,<YOUR_REDIRECT_URI>, and<YOUR_SCOPES>with the above obtained values. -
Paste it in the browser and select your developer test account to install the app when prompted.
-
A code will be displayed in the browser. Copy that code.
-
Run the following curl command. Replace the
<YOUR_CLIENT_ID>,<YOUR_REDIRECT_URI>, and<YOUR_CLIENT_SECRET>with your specific value. Use the code you received in the above step 3 as the<CODE>.-
Linux/macOS
curl --request POST \ --url https://api.hubapi.com/oauth/v1/token \ --header 'content-type: application/x-www-form-urlencoded' \ --data 'grant_type=authorization_code&code=<CODE>&redirect_uri=<YOUR_REDIRECT_URI>&client_id=<YOUR_CLIENT_ID>&client_secret=<YOUR_CLIENT_SECRET>' -
Windows
curl --request POST ^ --url https://api.hubapi.com/oauth/v1/token ^ --header 'content-type: application/x-www-form-urlencoded' ^ --data 'grant_type=authorization_code&code=<CODE>&redirect_uri=<YOUR_REDIRECT_URI>&client_id=<YOUR_CLIENT_ID>&client_secret=<YOUR_CLIENT_SECRET>'
This command will return the access token necessary for API calls.
{ "token_type": "bearer", "refresh_token": "<Refresh Token>", "access_token": "<Access Token>", "expires_in": 1800 } -
-
Store the access token and refresh token securely for use in your application.
Quickstart
To use the HubSpot CRM Object Tickets connector in your Ballerina application, update the .bal file as follows:
Step 1: Import the module
Import the hubspot.crm.obj.tickets module and oauth2 module.
import ballerinax/hubspot.crm.obj.tickets as hstickets; import ballerina/oauth2;
Step 2: Instantiate a new connector
-
Create a
Config.tomlfile inside the Ballerina package and add the following configurations with the values retrieved in the earlier steps as follows:clientId = <Client Id> clientSecret = <Client Secret> refreshToken = <Refresh Token> -
Instantiate a
OAuth2RefreshTokenGrantConfigwith the obtained credentials and initialize the connector with it.configurable string clientId = ?; configurable string clientSecret = ?; configurable string refreshToken = ?; OAuth2RefreshTokenGrantConfig auth = { clientId, clientSecret, refreshToken, credentialBearer: oauth2:POST_BODY_BEARER }; final Client HubSpotClient = check new ({auth});
Now, utilize the available connector operations. A sample use case is shown below.
Create a New Ticket
public function main() returns error? { hstickets:SimplePublicObjectInputForCreate payload = { properties: { "hs_pipeline": "0", "hs_pipeline_stage": "1", "hs_ticket_priority": "HIGH", "subject": "New troubleshoot report" } }; hstickets:SimplePublicObject response = check HubSpotClient->/.post(payload); io:println(response); }
Examples
The HubSpot CRM Object Tickets connector provides practical examples illustrating usage in various scenarios. Explore these examples, covering the following use cases:
- Ticket Management System - Integrate HubSpot with multiple customer support channels to streamline ticket management.
- Weekly Tickets Report Generation - Analyze detailed summaries of customer tickets in each week for better support
Clients
hubspot.crm.obj.tickets: Client
Constructor
Gets invoked to initialize the connector.
init (ConnectionConfig config, string serviceUrl)- config ConnectionConfig - The configurations to be used when initializing the
connector
- serviceUrl string "https://api.hubapi.com/crm/v3/objects/tickets" - URL of the target service
delete [string ticketId]
Archive
get .
function get .(map<string|string[]> headers, *GetCrmV3ObjectsTickets_getpageQueries queries) returns CollectionResponseSimplePublicObjectWithAssociationsForwardPaging|errorList
Parameters
- queries *GetCrmV3ObjectsTickets_getpageQueries - Queries to be sent with the request
Return Type
- CollectionResponseSimplePublicObjectWithAssociationsForwardPaging|error - successful operation
get [string ticketId]
function get [string ticketId](map<string|string[]> headers, *GetCrmV3ObjectsTicketsTicketid_getbyidQueries queries) returns SimplePublicObjectWithAssociations|errorRead
Parameters
- queries *GetCrmV3ObjectsTicketsTicketid_getbyidQueries - Queries to be sent with the request
Return Type
- SimplePublicObjectWithAssociations|error - successful operation
patch [string ticketId]
function patch [string ticketId](SimplePublicObjectInput payload, map<string|string[]> headers, *PatchCrmV3ObjectsTicketsTicketid_updateQueries queries) returns SimplePublicObject|errorUpdate
Parameters
- payload SimplePublicObjectInput -
- queries *PatchCrmV3ObjectsTicketsTicketid_updateQueries - Queries to be sent with the request
Return Type
- SimplePublicObject|error - successful operation
post .
function post .(SimplePublicObjectInputForCreate payload, map<string|string[]> headers) returns SimplePublicObject|errorCreate
Parameters
- payload SimplePublicObjectInputForCreate -
Return Type
- SimplePublicObject|error - successful operation
post batch/archive
function post batch/archive(BatchInputSimplePublicObjectId payload, map<string|string[]> headers) returns Response|errorArchive a batch of tickets by ID
Parameters
- payload BatchInputSimplePublicObjectId -
post batch/create
function post batch/create(BatchInputSimplePublicObjectInputForCreate payload, map<string|string[]> headers) returns BatchResponseSimplePublicObject|BatchResponseSimplePublicObjectWithErrors|errorCreate a batch of tickets
Parameters
Return Type
- BatchResponseSimplePublicObject|BatchResponseSimplePublicObjectWithErrors|error - successful operation
post batch/read
function post batch/read(BatchReadInputSimplePublicObjectId payload, map<string|string[]> headers, *PostCrmV3ObjectsTicketsBatchRead_readQueries queries) returns BatchResponseSimplePublicObject|BatchResponseSimplePublicObjectWithErrors|errorRead a batch of tickets by internal ID, or unique property values
Parameters
- payload BatchReadInputSimplePublicObjectId -
- queries *PostCrmV3ObjectsTicketsBatchRead_readQueries - Queries to be sent with the request
Return Type
- BatchResponseSimplePublicObject|BatchResponseSimplePublicObjectWithErrors|error - successful operation
post batch/update
function post batch/update(BatchInputSimplePublicObjectBatchInput payload, map<string|string[]> headers) returns BatchResponseSimplePublicObject|BatchResponseSimplePublicObjectWithErrors|errorUpdate a batch of tickets by internal ID, or unique property values
Parameters
- payload BatchInputSimplePublicObjectBatchInput -
Return Type
- BatchResponseSimplePublicObject|BatchResponseSimplePublicObjectWithErrors|error - successful operation
post batch/upsert
function post batch/upsert(BatchInputSimplePublicObjectBatchInputUpsert payload, map<string|string[]> headers) returns BatchResponseSimplePublicUpsertObject|BatchResponseSimplePublicUpsertObjectWithErrors|errorCreate or update a batch of tickets by unique property values
Parameters
Return Type
- BatchResponseSimplePublicUpsertObject|BatchResponseSimplePublicUpsertObjectWithErrors|error - successful operation
post merge
function post merge(PublicMergeInput payload, map<string|string[]> headers) returns SimplePublicObject|errorMerge two tickets with same type
Parameters
- payload PublicMergeInput -
Return Type
- SimplePublicObject|error - successful operation
post search
function post search(PublicObjectSearchRequest payload, map<string|string[]> headers) returns CollectionResponseWithTotalSimplePublicObjectForwardPaging|errorParameters
- payload PublicObjectSearchRequest -
Return Type
- CollectionResponseWithTotalSimplePublicObjectForwardPaging|error - successful operation
Records
hubspot.crm.obj.tickets: ApiKeysConfig
Provides API key configurations needed when communicating with a remote HTTP endpoint.
Fields
- private\-app\-legacy string -
- private\-app string -
hubspot.crm.obj.tickets: AssociatedId
Fields
- id string -
- 'type string -
hubspot.crm.obj.tickets: AssociationSpec
Fields
- associationCategory? "HUBSPOT_DEFINED"|"USER_DEFINED"|"INTEGRATOR_DEFINED" -
- associationTypeId? Signed32 -
hubspot.crm.obj.tickets: BatchInputSimplePublicObjectBatchInput
Fields
- inputs SimplePublicObjectBatchInput[] -
hubspot.crm.obj.tickets: BatchInputSimplePublicObjectBatchInputUpsert
Fields
- inputs SimplePublicObjectBatchInputUpsert[] -
hubspot.crm.obj.tickets: BatchInputSimplePublicObjectId
Fields
- inputs SimplePublicObjectId[] -
hubspot.crm.obj.tickets: BatchInputSimplePublicObjectInputForCreate
Fields
- inputs SimplePublicObjectInputForCreate[] -
hubspot.crm.obj.tickets: BatchReadInputSimplePublicObjectId
Fields
- propertiesWithHistory string[] -
- idProperty? string -
- inputs SimplePublicObjectId[] -
- properties string[] -
hubspot.crm.obj.tickets: BatchResponseSimplePublicObject
Fields
- completedAt string -
- requestedAt? string -
- startedAt string -
- links? record { string... } -
- results SimplePublicObject[] -
- status "PENDING"|"PROCESSING"|"CANCELED"|"COMPLETE" -
hubspot.crm.obj.tickets: BatchResponseSimplePublicObjectWithErrors
Fields
- completedAt string -
- numErrors? Signed32 -
- requestedAt? string -
- startedAt string -
- links? record { string... } -
- results SimplePublicObject[] -
- errors? StandardError[] -
- status "PENDING"|"PROCESSING"|"CANCELED"|"COMPLETE" -
hubspot.crm.obj.tickets: BatchResponseSimplePublicUpsertObject
Fields
- completedAt string -
- requestedAt? string -
- startedAt string -
- links? record { string... } -
- results SimplePublicUpsertObject[] -
- status "PENDING"|"PROCESSING"|"CANCELED"|"COMPLETE" -
hubspot.crm.obj.tickets: BatchResponseSimplePublicUpsertObjectWithErrors
Fields
- completedAt string -
- numErrors? Signed32 -
- requestedAt? string -
- startedAt string -
- links? record { string... } -
- results SimplePublicUpsertObject[] -
- errors? StandardError[] -
- status "PENDING"|"PROCESSING"|"CANCELED"|"COMPLETE" -
hubspot.crm.obj.tickets: ClientHttp1Settings
Provides settings related to HTTP/1.x protocol.
Fields
- keepAlive KeepAlive(default http:KEEPALIVE_AUTO) - Specifies whether to reuse a connection for multiple requests
- chunking Chunking(default http:CHUNKING_AUTO) - The chunking behaviour of the request
- proxy? ProxyConfig - Proxy server related options
hubspot.crm.obj.tickets: CollectionResponseAssociatedId
Fields
- paging? Paging -
- results AssociatedId[] -
hubspot.crm.obj.tickets: CollectionResponseSimplePublicObjectWithAssociationsForwardPaging
Fields
- paging? ForwardPaging -
- results SimplePublicObjectWithAssociations[] -
hubspot.crm.obj.tickets: CollectionResponseWithTotalSimplePublicObjectForwardPaging
Fields
- total Signed32 -
- paging? ForwardPaging -
- results SimplePublicObject[] -
hubspot.crm.obj.tickets: ConnectionConfig
Provides a set of configurations for controlling the behaviours when communicating with a remote HTTP endpoint.
Fields
- auth BearerTokenConfig|OAuth2RefreshTokenGrantConfig|ApiKeysConfig - Provides Auth configurations needed when communicating with a remote HTTP endpoint.
- httpVersion HttpVersion(default http:HTTP_2_0) - The HTTP version understood by the client
- http1Settings? ClientHttp1Settings - Configurations related to HTTP/1.x protocol
- http2Settings? ClientHttp2Settings - Configurations related to HTTP/2 protocol
- timeout decimal(default 60) - The maximum time to wait (in seconds) for a response before closing the connection
- forwarded string(default "disable") - The choice of setting
forwarded/x-forwardedheader
- poolConfig? PoolConfiguration - Configurations associated with request pooling
- cache? CacheConfig - HTTP caching related configurations
- compression Compression(default http:COMPRESSION_AUTO) - Specifies the way of handling compression (
accept-encoding) header
- circuitBreaker? CircuitBreakerConfig - Configurations associated with the behaviour of the Circuit Breaker
- retryConfig? RetryConfig - Configurations associated with retrying
- responseLimits? ResponseLimitConfigs - Configurations associated with inbound response size limits
- secureSocket? ClientSecureSocket - SSL/TLS-related options
- proxy? ProxyConfig - Proxy server related options
- validation boolean(default true) - Enables the inbound payload validation functionality which provided by the constraint package. Enabled by default
hubspot.crm.obj.tickets: ErrorDetail
Fields
- subCategory? string - A specific category that contains more specific detail about the error
- code? string - The status code associated with the error detail
- 'in? string - The name of the field or parameter in which the error was found.
- context? record { string[]... } - Context about the error condition
- message string - A human readable message describing the error along with remediation steps where appropriate
hubspot.crm.obj.tickets: Filter
Fields
- highValue? string -
- propertyName string -
- values? string[] -
- value? string -
- operator "EQ"|"NEQ"|"LT"|"LTE"|"GT"|"GTE"|"BETWEEN"|"IN"|"NOT_IN"|"HAS_PROPERTY"|"NOT_HAS_PROPERTY"|"CONTAINS_TOKEN"|"NOT_CONTAINS_TOKEN" - null
hubspot.crm.obj.tickets: FilterGroup
Fields
- filters Filter[] -
hubspot.crm.obj.tickets: ForwardPaging
Fields
- next? NextPage -
hubspot.crm.obj.tickets: GetCrmV3ObjectsTickets_getpageQueries
Represents the Queries record for the operation: get-/crm/v3/objects/tickets_getPage
Fields
- associations? string[] - A comma separated list of object types to retrieve associated IDs for. If any of the specified associations do not exist, they will be ignored.
- archived boolean(default false) - Whether to return only results that have been archived.
- propertiesWithHistory? string[] - A comma separated list of the properties to be returned along with their history of previous values. If any of the specified properties are not present on the requested object(s), they will be ignored. Usage of this parameter will reduce the maximum number of objects that can be read by a single request.
- 'limit Signed32(default 10) - The maximum number of results to display per page.
- after? string - The paging cursor token of the last successfully read resource will be returned as the
paging.next.afterJSON property of a paged response containing more results.
- properties? string[] - A comma separated list of the properties to be returned in the response. If any of the specified properties are not present on the requested object(s), they will be ignored.
hubspot.crm.obj.tickets: GetCrmV3ObjectsTicketsTicketid_getbyidQueries
Represents the Queries record for the operation: get-/crm/v3/objects/tickets/{ticketId}_getById
Fields
- associations? string[] - A comma separated list of object types to retrieve associated IDs for. If any of the specified associations do not exist, they will be ignored.
- archived boolean(default false) - Whether to return only results that have been archived.
- propertiesWithHistory? string[] - A comma separated list of the properties to be returned along with their history of previous values. If any of the specified properties are not present on the requested object(s), they will be ignored.
- idProperty? string - The name of a property whose values are unique for this object
- properties? string[] - A comma separated list of the properties to be returned in the response. If any of the specified properties are not present on the requested object(s), they will be ignored.
hubspot.crm.obj.tickets: NextPage
Fields
- link? string -
- after string -
hubspot.crm.obj.tickets: OAuth2RefreshTokenGrantConfig
OAuth2 Refresh Token Grant Configs
Fields
- Fields Included from *OAuth2RefreshTokenGrantConfig
- refreshUrl string(default "https://api.hubapi.com/oauth/v1/token") - Refresh URL
hubspot.crm.obj.tickets: Paging
Fields
- next? NextPage -
- prev? PreviousPage -
hubspot.crm.obj.tickets: PatchCrmV3ObjectsTicketsTicketid_updateQueries
Represents the Queries record for the operation: patch-/crm/v3/objects/tickets/{ticketId}_update
Fields
- idProperty? string - The name of a property whose values are unique for this object
hubspot.crm.obj.tickets: PostCrmV3ObjectsTicketsBatchRead_readQueries
Represents the Queries record for the operation: post-/crm/v3/objects/tickets/batch/read_read
Fields
- archived boolean(default false) - Whether to return only results that have been archived.
hubspot.crm.obj.tickets: PreviousPage
Fields
- before string -
- link? string -
hubspot.crm.obj.tickets: ProxyConfig
Proxy server configurations to be used with the HTTP client endpoint.
Fields
- host string(default "") - Host name of the proxy server
- port int(default 0) - Proxy server port
- userName string(default "") - Proxy server username
- password string(default "") - Proxy server password
hubspot.crm.obj.tickets: PublicAssociationsForObject
Fields
- types? AssociationSpec[] -
- to? PublicObjectId -
hubspot.crm.obj.tickets: PublicMergeInput
Fields
- objectIdToMerge string -
- primaryObjectId string -
hubspot.crm.obj.tickets: PublicObjectId
Fields
- id? string -
hubspot.crm.obj.tickets: PublicObjectSearchRequest
Fields
- query? string -
- 'limit? Signed32 -
- after? string -
- sorts? string[] -
- properties? string[] -
- filterGroups? FilterGroup[] -
hubspot.crm.obj.tickets: SimplePublicObject
Fields
- createdAt string -
- archived? boolean -
- archivedAt? string -
- propertiesWithHistory? record { ValueWithTimestamp[]... } -
- id string -
- properties record { string?... } -
- updatedAt string -
hubspot.crm.obj.tickets: SimplePublicObjectBatchInput
Fields
- idProperty? string -
- objectWriteTraceId? string -
- id string -
- properties record { string... } -
hubspot.crm.obj.tickets: SimplePublicObjectBatchInputUpsert
Fields
- idProperty? string -
- objectWriteTraceId? string -
- id string -
- properties record { string... } -
hubspot.crm.obj.tickets: SimplePublicObjectId
Fields
- id string -
hubspot.crm.obj.tickets: SimplePublicObjectInput
Fields
- objectWriteTraceId? string -
- properties record { string... } -
hubspot.crm.obj.tickets: SimplePublicObjectInputForCreate
Fields
- associations? PublicAssociationsForObject[] -
- objectWriteTraceId? string -
- properties record { string... } -
hubspot.crm.obj.tickets: SimplePublicObjectWithAssociations
Fields
- associations? record { CollectionResponseAssociatedId... } -
- createdAt string -
- archived? boolean -
- archivedAt? string -
- propertiesWithHistory? record { ValueWithTimestamp[]... } -
- id string -
- properties record { string?... } -
- updatedAt string -
hubspot.crm.obj.tickets: SimplePublicUpsertObject
Fields
- createdAt string -
- archived? boolean -
- archivedAt? string -
- 'new boolean -
- propertiesWithHistory? record { ValueWithTimestamp[]... } -
- id string -
- properties record { string... } -
- updatedAt string -
hubspot.crm.obj.tickets: StandardError
Fields
- subCategory? record {} -
- context record { string[]... } -
- links record { string... } -
- id? string -
- category string -
- message string -
- errors ErrorDetail[] -
- status string -
hubspot.crm.obj.tickets: ValueWithTimestamp
Fields
- sourceId? string -
- sourceType string -
- sourceLabel? string -
- updatedByUserId? Signed32 -
- value string -
- timestamp string -